Admin tab
The tab "Admin" in the header of Open IRIS (next to Browse, Scheduler, Services and Dashboard) is only visible if you are an admin. This can e.g. be for a single provider or the whole portal. Which sub-tabs you see below the admin tab is depending on what you are an admin of. Please note that resource admins do not see this tab.
Inbox
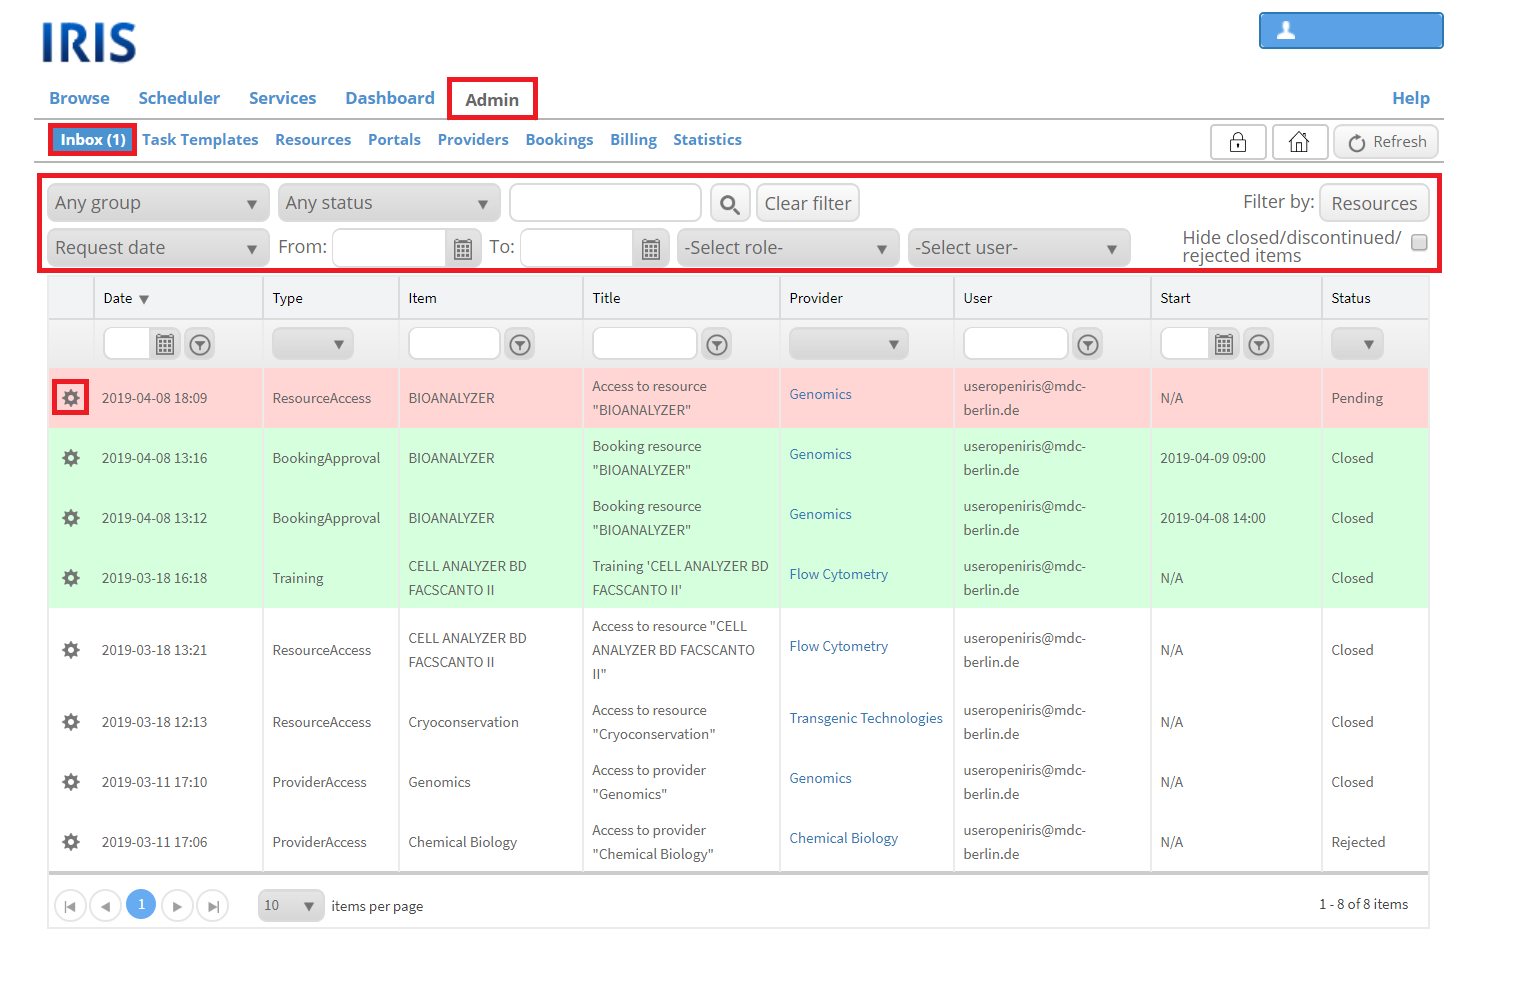
In this tab all requests (for training, access to a resource or a provider, booking, etc), services and issues are displayed. Requests in red are still pending, in green are approved and in white are rejected or closed. Working with this tab is the easiest way to respond to requests and to filter them. On top of the list are multiple filter options (you can select the group, status, request date, user, resource, etc.). Additionally it is possible to hide all closed/discontinued/rejected items by ticking the corresponding box. You can edit the entries by clicking on the gear wheel symbol. This way you can easily respond to issue reports, training requests etc. How to respond to them is explained in more detail in their respective Wiki-articles. Every request has a little grey triangle symbol in the place of the gear wheel symbol. If you click on it the entry expands with more information. Two weeks before a request reaches its end date it will send you an alert into your inbox. The request will then be highlighted in yellow and in the "Details" sub-tab there is a red warning next to the end date.
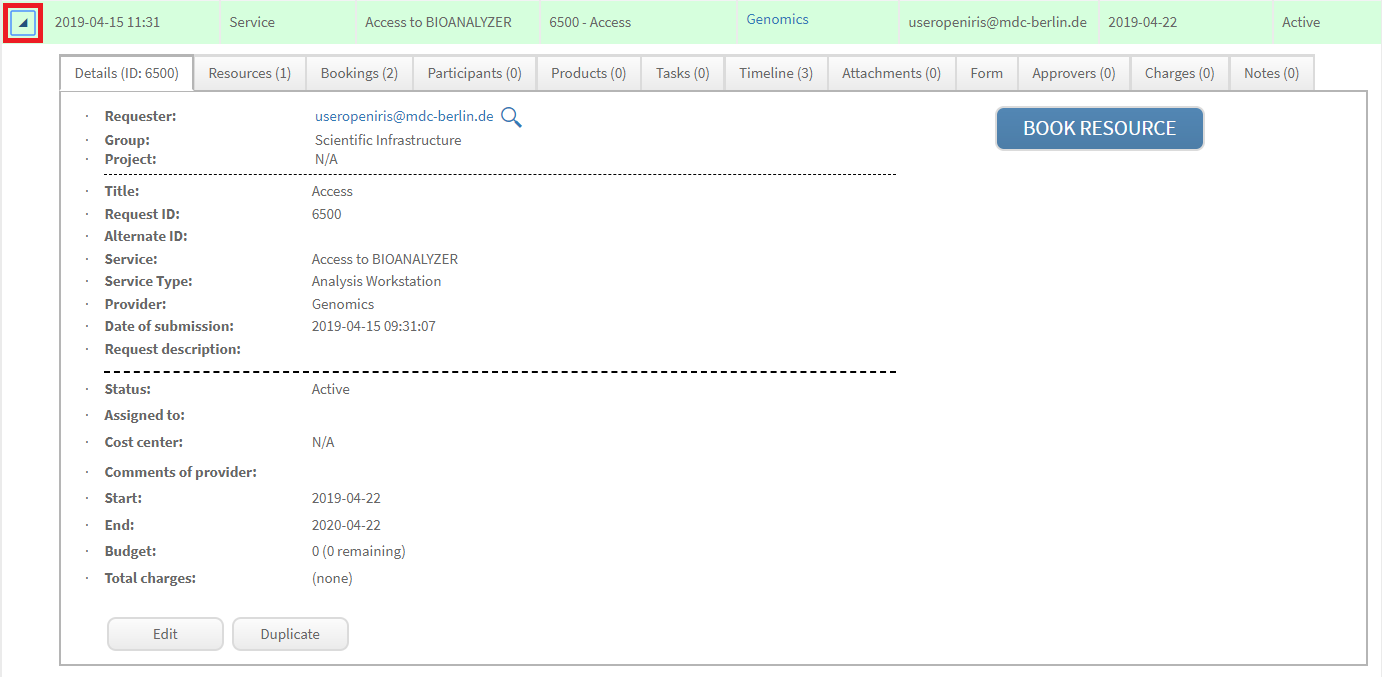
When clicking on the little arrow symbol multiple tabs with information become visible:
DETAILS: details about this request (can partially be edited by clicking on "Edit")
RESOURCES: list of resources which are attached to this request; the "Select Resources" button allows you to add additional resources; the "Remove" button removes resources from the request.
REQUESTS: This tab is only displayed if the request is a parent request. This tab then contains all sub-requests. Read more about request based requesting here.
BOOKINGS: list of all bookings through this request
PARTICIPANTS: allows you to view, add and remove participants of the request
PRODUCTS: Products can be created at ADMIN.PRODUCTS (described in more detail later in this article) and then be added to a request. In this tab products can be viewed, added, edited and commented for the request. From this product listing quotes can be created with individual templates. These quotes will be saved in the "Attachment" tab. Quotes are explained in more details here.
TASKS: allows to create, review and manage tasks of the request. The "New task" button allows you to create a task and assign it to users. To create a new task, a task template must be defined in the ADMIN.TASK TEMPLATES tab (described in more detail later in this article). Clicking on "View Gantt chart" will pull up a review of the tasks that can be exported to pdf. To view a Gantt chart at least one task must be created.
TIMELINE: timeline of events, that were made with this request (e.g. when was the request send, when was the request set to active, etc.)
ATTACHMENTS: here files can be attached to the request; created files (e.g. quote of products) are saved here
FORM: form with information filled out by user for this request found here, can be edited or exported as PDF file
APPROVERS: allows to add additional users to approve this request
CHARGES:
NOTES: "Add note": send a note to requester, approvers, participants, admins and/or assigned to; "Export": export all notes in an excel file; it is possible to request a follow up and to control who receives the note
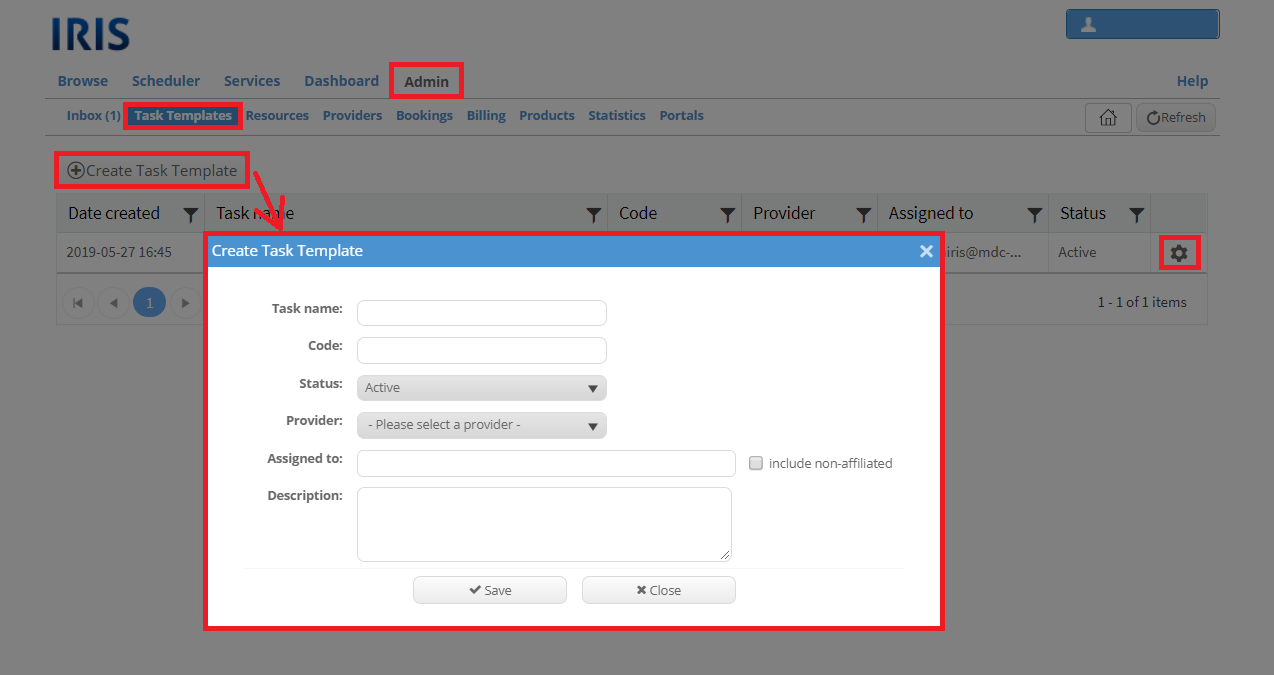
Task Templates
This tab tracks templates and can be used to create and manage all your task templates. A new task template is created by clicking on "Create Task Template". It can later be edited by clicking on the gear wheel symbol on the right of a task template.
Resources
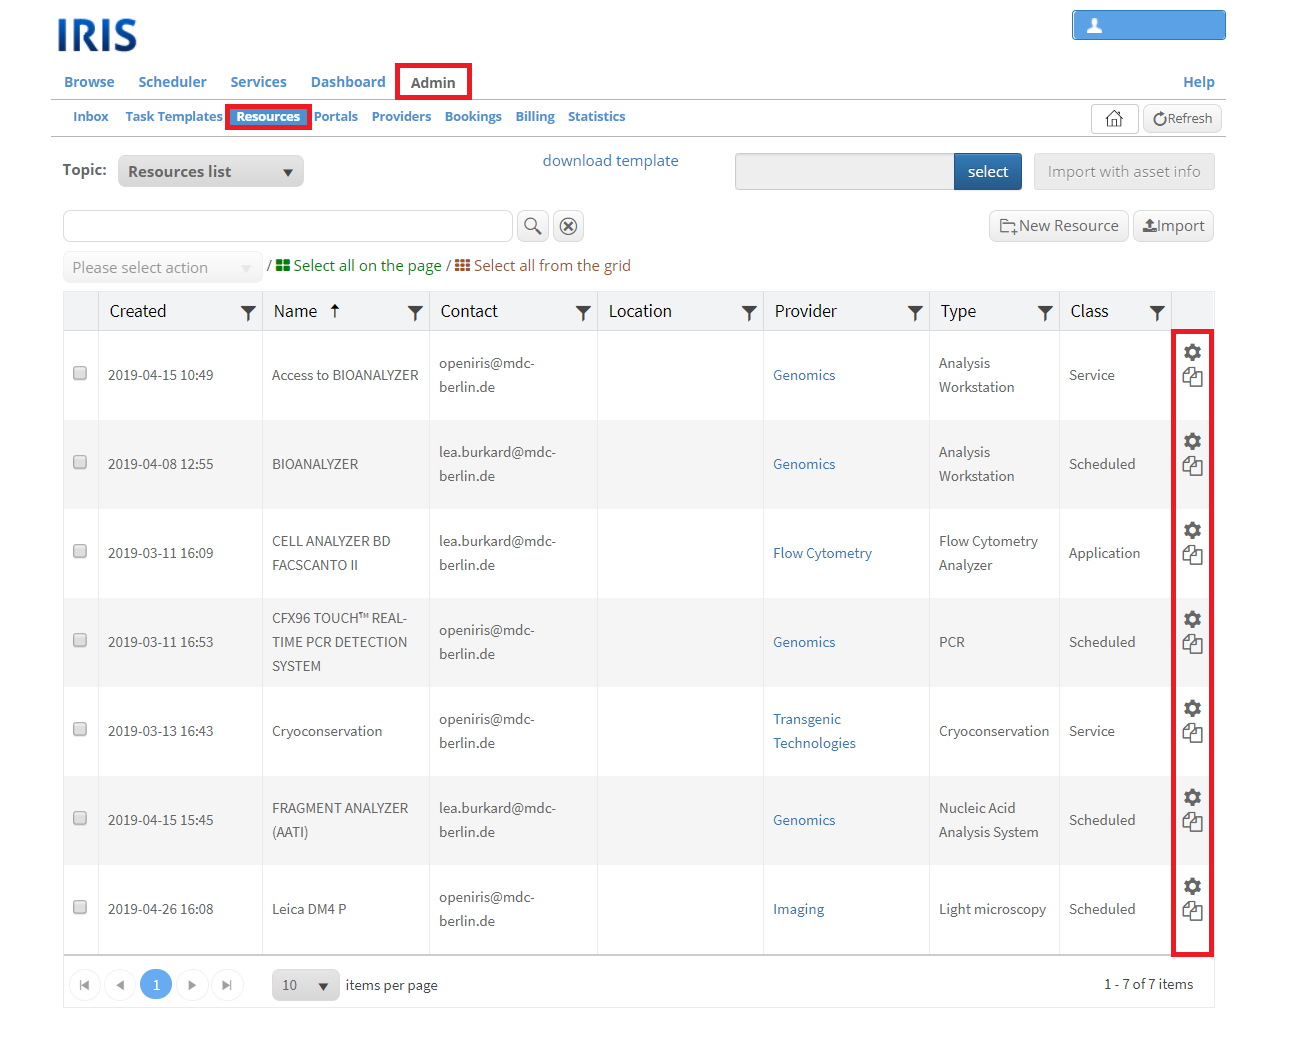
Topic: Resource list
In this topic all resources you are an admin of are displayed. It is also possible to create a new resource by clicking on "New Resource". You can edit them by clicking on the gear wheel symbol and duplicate them by clicking on the symbol with the two pages. You can export the entries as CSV or Excel file by first selecting the wanted or all resources and then selecting the wanted action. You can also delete selected entries.
Topic: Resource types
This topic shows all possible resource types and allows the creation of new ones. To create a new one click on "New Resource Type". A new window will open. It is required to give this new resource type a name and link it to every provider you are an admin of, where you would like to use this type. Further it is possible to add a description and an image. It is possible to exclude the type from resource searches by ticking the respective box.
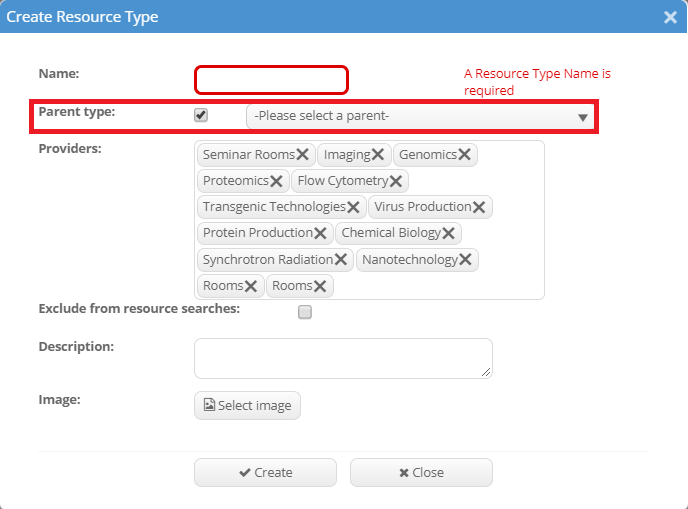
There are parent and child resource types. Child resource types are subordinates of the parent resource types. Each resource type can be a parent type. To create a child type tick the button "Parent type". A new selection box appears where you need to select the parent type for the child.
Providers
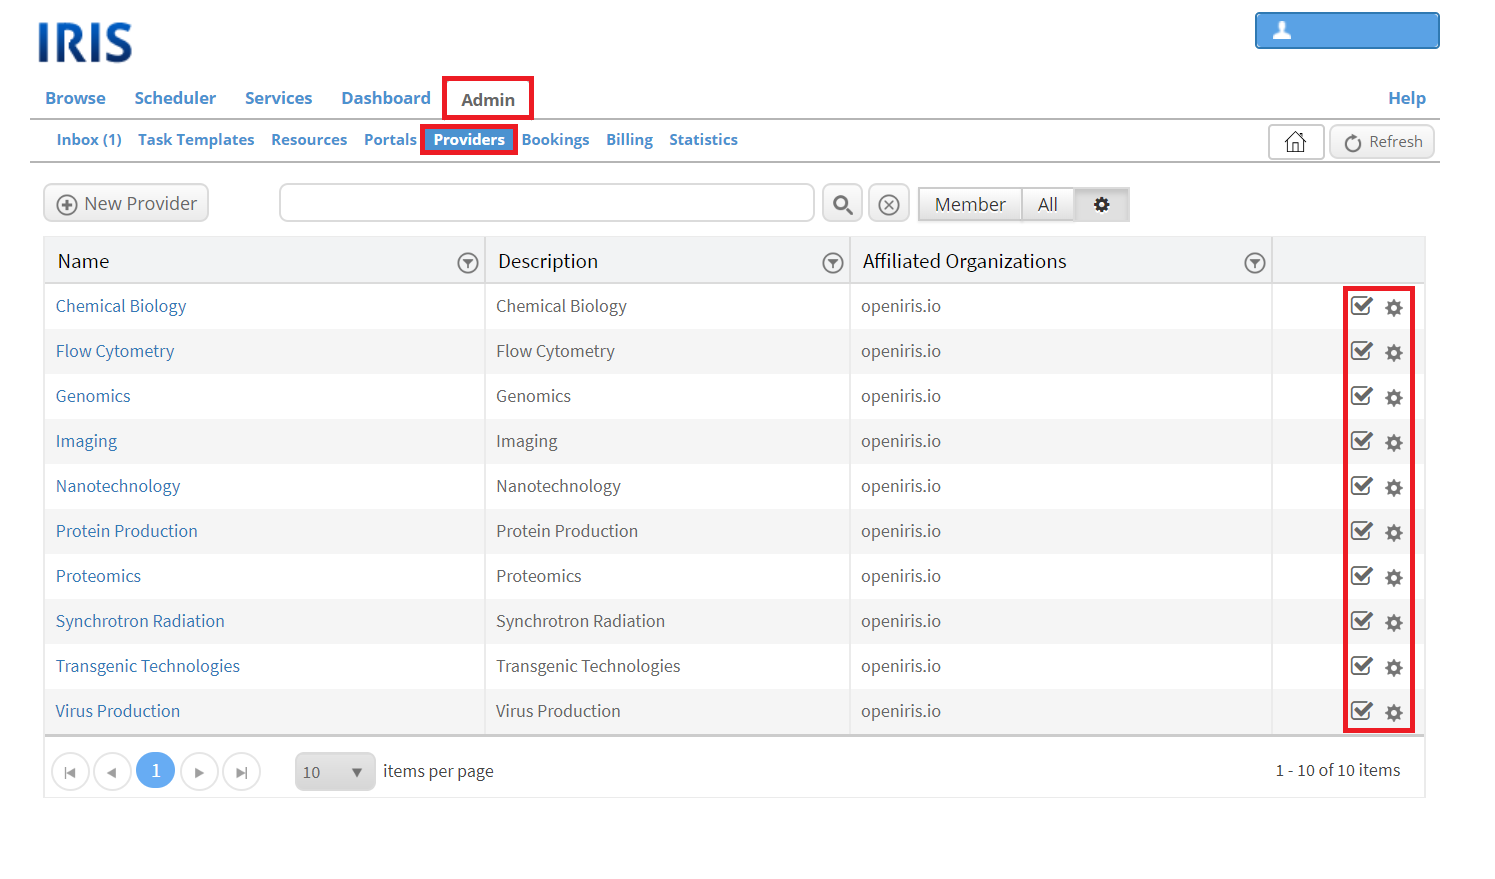
In this tab are all providers listed you are an admin of. You can open the provider settings by clicking on the gear wheel symbol on the right side of each provider. The detail window opens if you click on the name of the provider. You can also add a new provider by clicking on "New provider". The check mark symbol shows that you have access to the provider. In this wiki you can read more about providers or provider admins.
Bookings
The tab "Bookings" allows you to view all bookings of your resources. It contains multiple topics.
Topic: Bookings
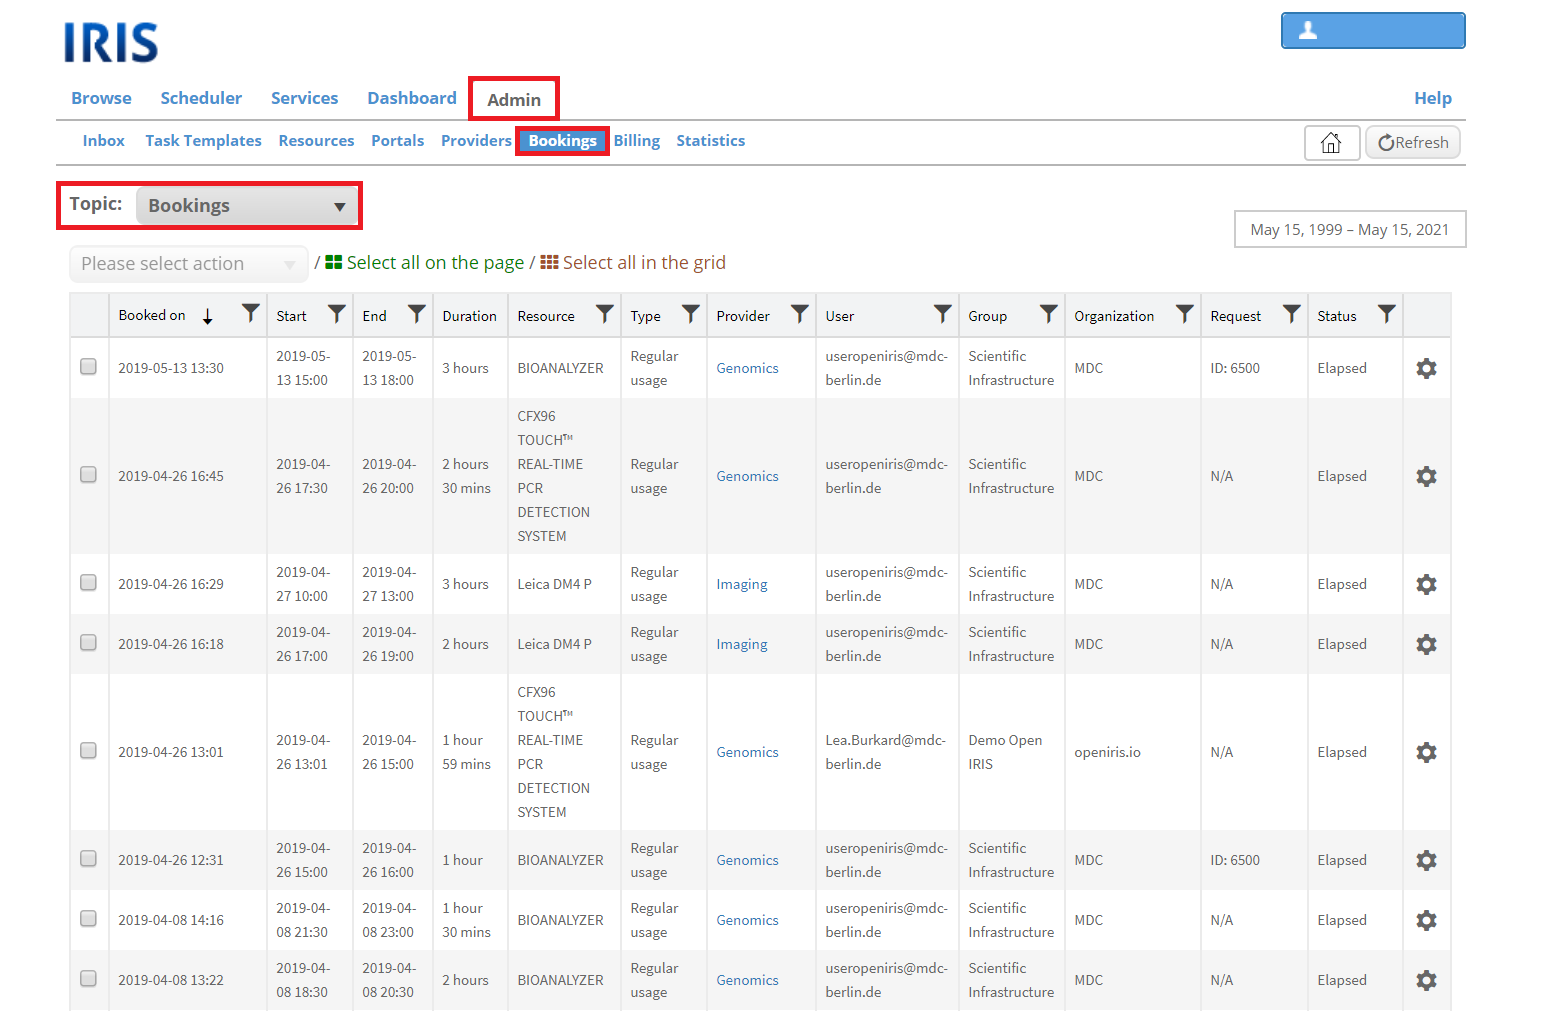
If you select this topic, all all bookings to resources you are an admin of are shown. They can be edited by clicking on the gear wheel. You can export the entries as CSV or Excel file by marking them and then select the wanted action. It is also possible to mark all. You can also delete, edit of recalculate the charges the selected entries. In the top right corner of the tab you can select the time frame of the shown entries.
Topic: Restrictions
As an admin you can add different restrictions to the booking of your resources. This means that under some conditions booking might not be possible while other conditions are required to book your resource. More information about restrictions can be found here: Defining restrictions.
Topic: Agent Log
Topic: Agent Settings
Topic: Public Views
With this feature it is possible to create public web views and iCal feeds for resources your are an admin of. These web views and iCal feeds can be publicly shared with everybody. They give information about the timeline and bookings of selected resources. More information about public views can be found here: Public view
Products
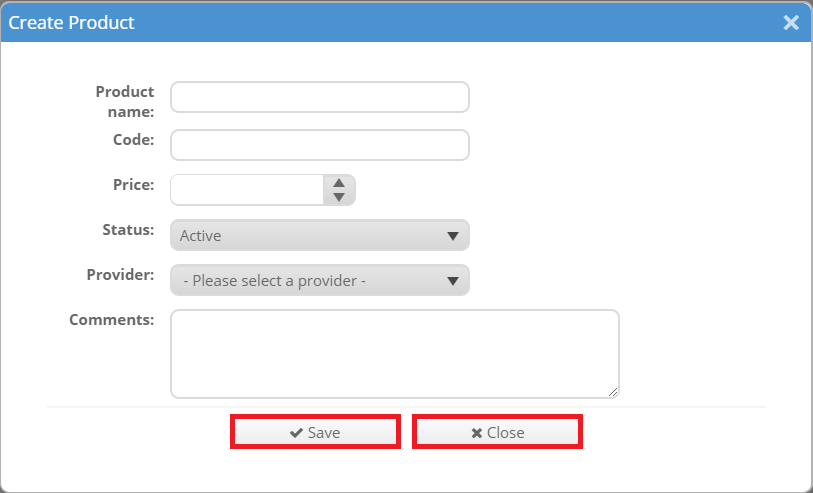
In the "Products" tab you can create products that your provider offers and charges for. By clicking on "Create Product" you can create a new product. A new window will open asking for more information about the product. You can save the new product by clicking of "Save". Clicking on "Close" will just close this window without saving the new product.
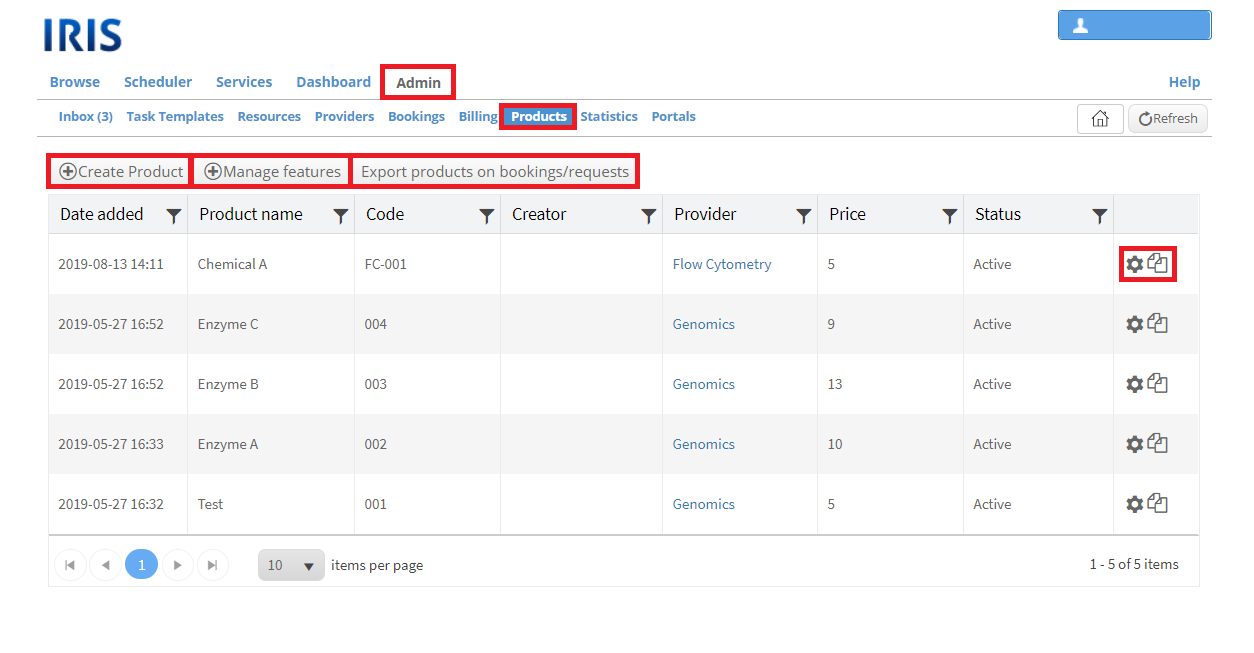
The button "Export products on bookings/ requests" opens a new window where you can select one provider. After clicking on "Export" all products of this provider are exported in one Excel sheet.
The products tab is explained in more detail here.
Billing
This tab is not always visible since by default billing is not enabled. Billing enables you to create price types and price lists for your fees and services. This makes it easy to keep track of all priced activities of your users in Open IRIS. The billing tab is explained in more detail here.
Statistics
This tab gives you usage statistics for selected resources. This allows you to view the utilization of resources. There are multiple filter options to show the desired statistics. By clicking on "Resources" you can select the shown resources. Clicking on the X symbol clears the selected resources.
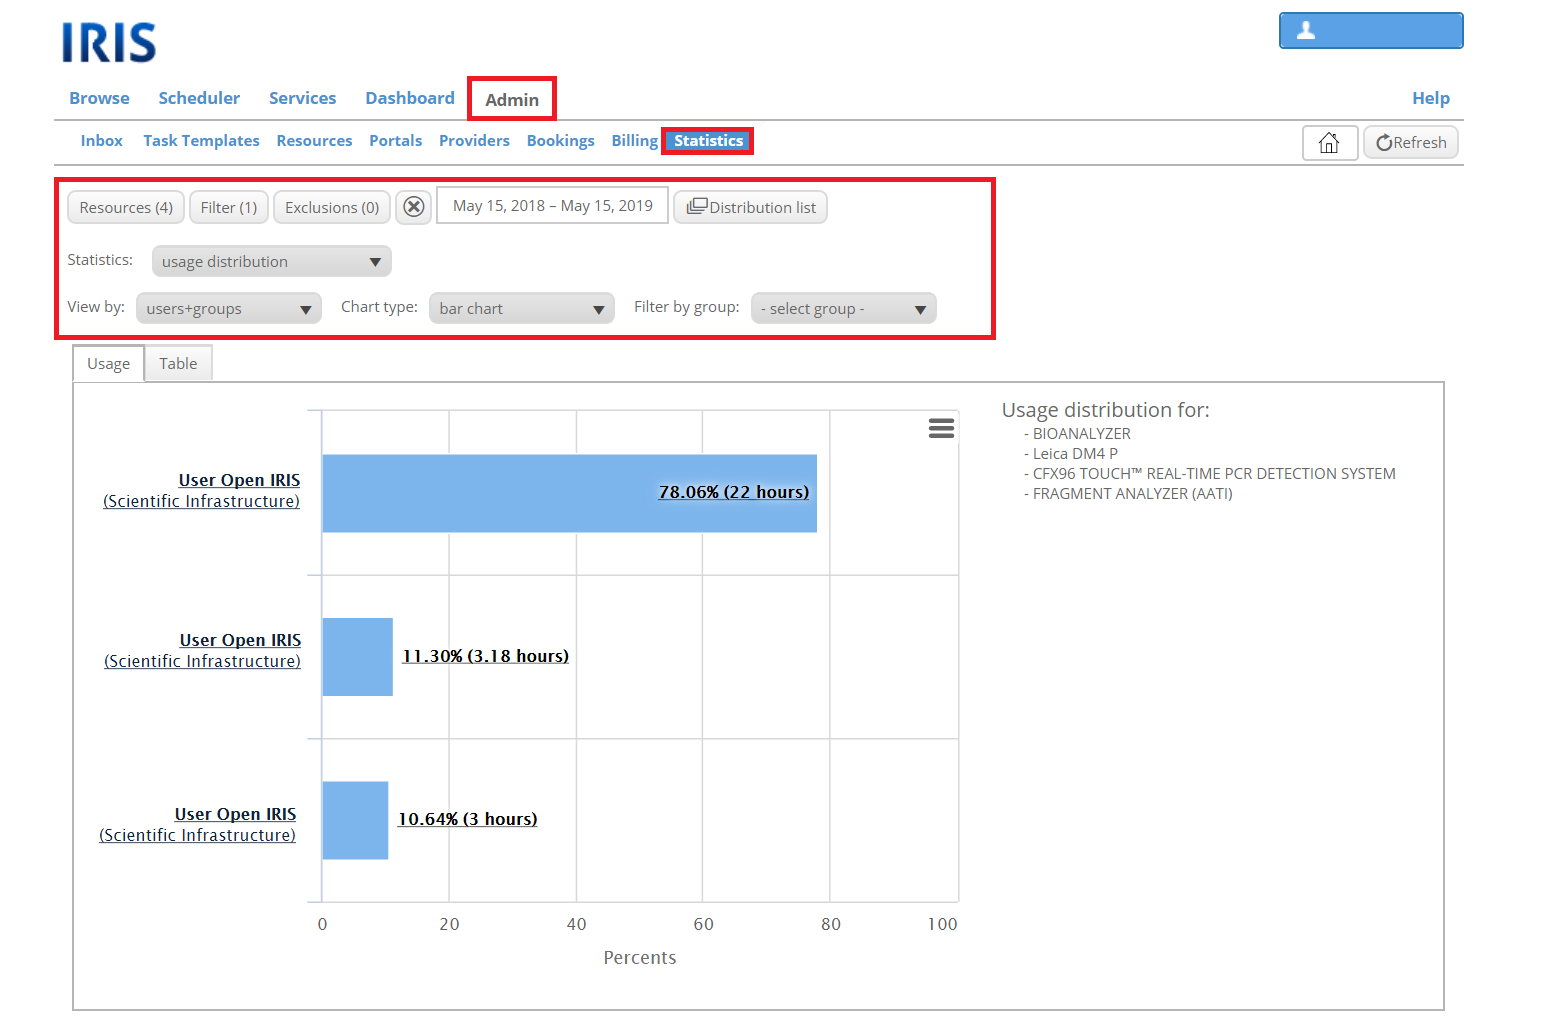
Clicking on "Filter" gives you more filter options. The following window will open:
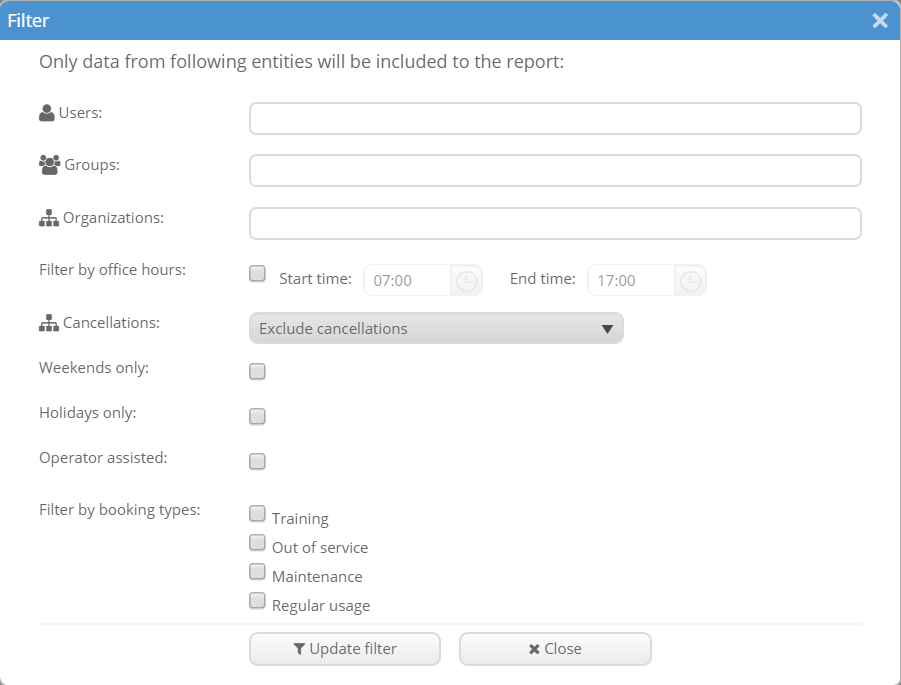
There you can choose what should be included in the statistics. This can be specific users, groups or organizations as well as cancellations, different booking types, etc.
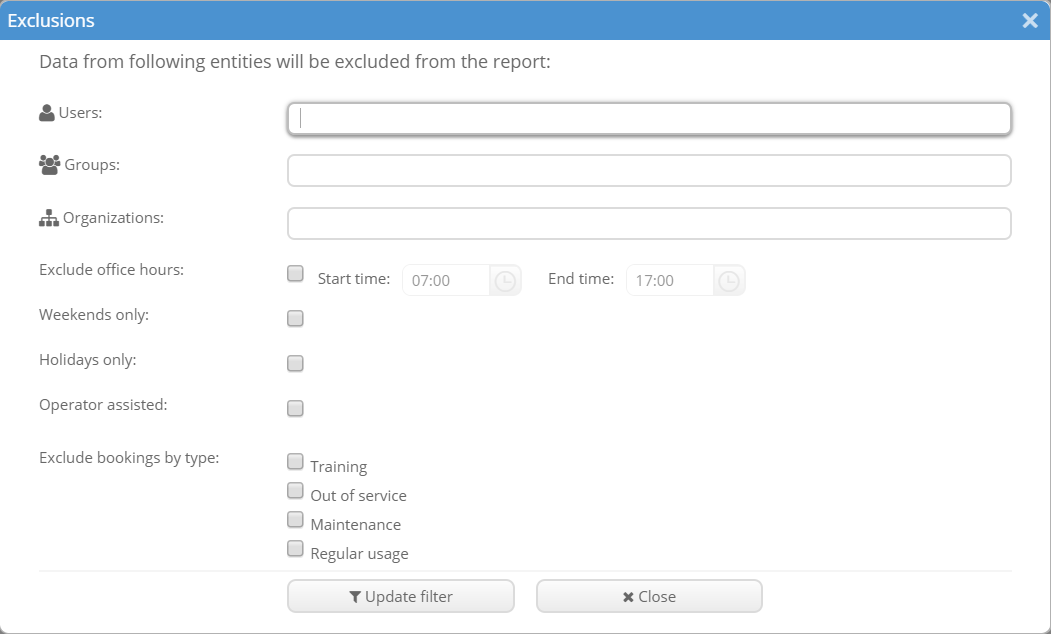
By clicking on "Exclusions" you can select what should be excluded from the statistics:
To show the statistics there are multiple forms possible. You can choose from "usage distribution", "usage", "heat map" and "totals". And for each form there are different types to choose from. When you have finished the statistics, you can save the graphic by clicking on the the grey bars. Now you have options to print the chart or to download it in different formats (JPEG, PNG, SVG, CSV or XLS).
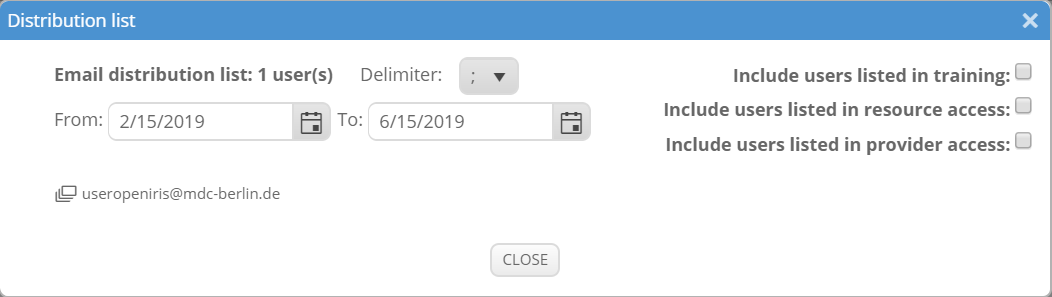
You can get a distribution list by clicking on the corresponding button. The following window will open with the distribution list in the bottom:
Portals
In this tab are all portals listed you are an admin of. To read further about the "Portals" tab, the portal in general or about portal administrators click here.
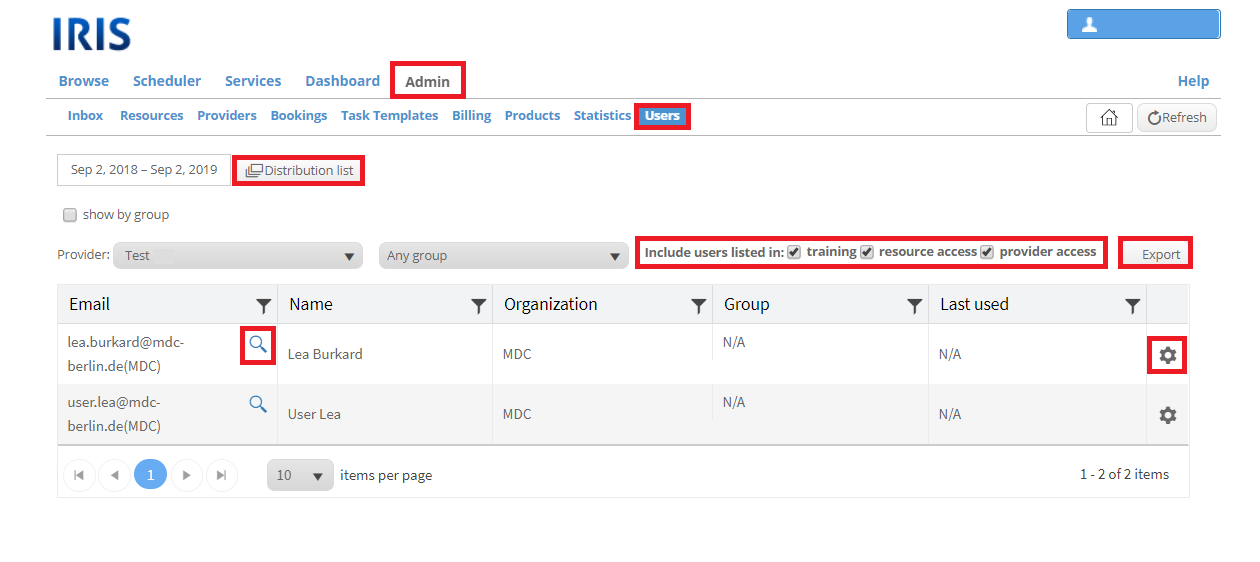
Users
In this tab all users of your providers and resources are listed. This tab contains information that was previously listed at ADMIN.STATISTICS.USERS. The information in this tab can be used for admins to communicate with their users (e.g. through the email addresses).
To get a list of the users you first need to select the desired provider. Then a group can but must not be selected. You can decide whether the users which are listed in training and/or users with only access to resource and provider but no bookings should be included in this list. This can be one by ticking (including) or unticking (excluding) the respective boxed. This list can also be exported to Excel. The Excel spreadsheet will also contain the columns "Group admin(s)" and "Group head(s)". Details of the users in this list can be seen by clicking on the magnifying glass symbol. A new window will open with four tabs containing general information, booking information, access to resources and requests. The same window opens when clicking on the magnifying glass next to the requester at ADMIN.INBOX.REQUEST.DETAILS. If you are able admin the user, the gear wheel symbol is displayed. When clicking on it a new window will open where you can edit bookings, the access to your resources, requests and the cost center. If the group of a user is given, then a magnifying glass is also displayed next to it. By clicking on it, a new window will open with information about the group.
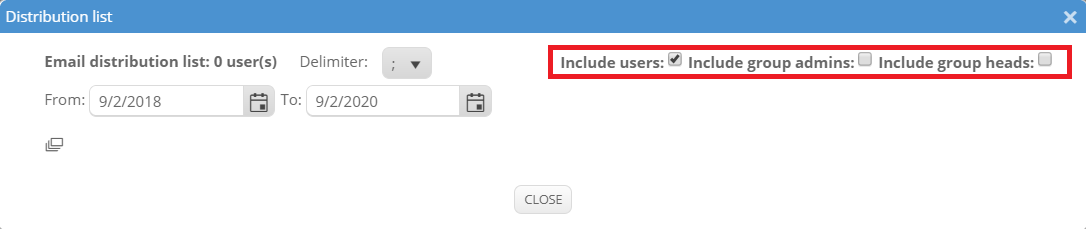
It is also possible to get a distribution list of the users. For a distribution list click on the respective button. A new window will open, where you can select the time period. The default distribution list includes only users but it can also include group admins and/or group heads.