Visibility and Access for Resources
Table of contents
- How to open the resource settings
- Visibility of resources
- Option 1: Access to provider (No additional settings)
- Option 2: Visibility set to “Invisible”
- Option 3: Visibility set to “Only visible with direct/request access to resource”
- Option 4: Visibility set to “Only visible with direct access to resource”
- Option 5: Visibility set to “Public”
- Option 6: “Hide usage statistics”
- Option 7: No provider access
- Timeline/ Calendar visibility
- Access and use of resources
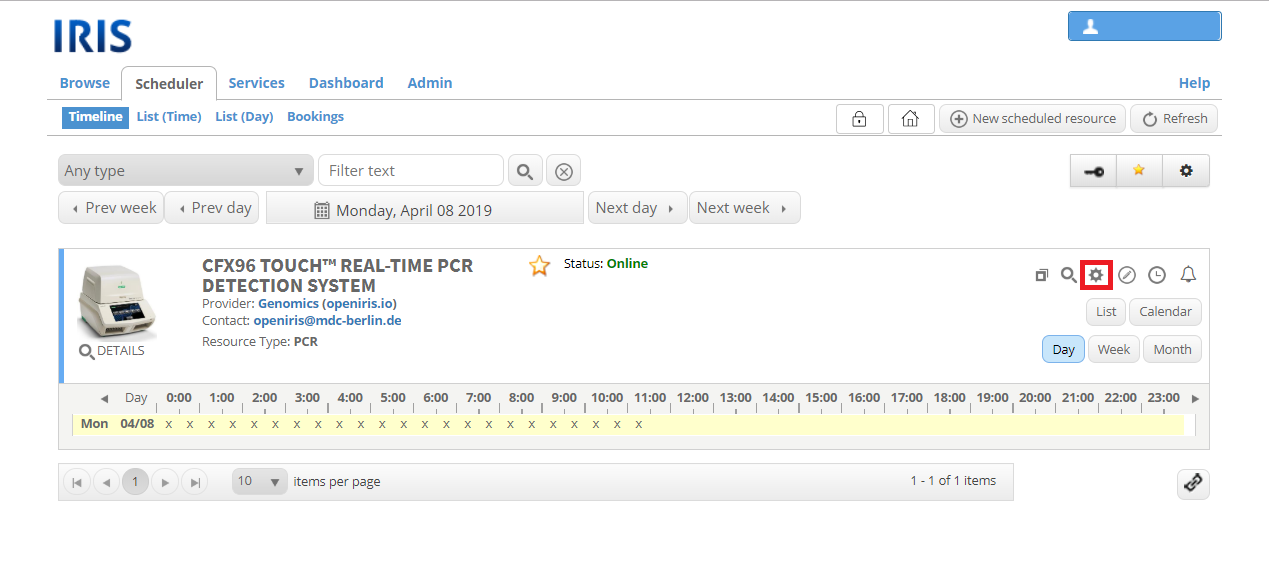
How to open the resource settings
To edit a resource, you have to click on the gear wheel in the toolbar of the resource. This symbol is only visible to portal, provider and resource admins. Now a new window called "Edit Resource" opens with multiple tabs. Whenever you edit your resource be sure to click “Update” to save the changes you made. By just clicking the “Close” button your changes will not be saved.
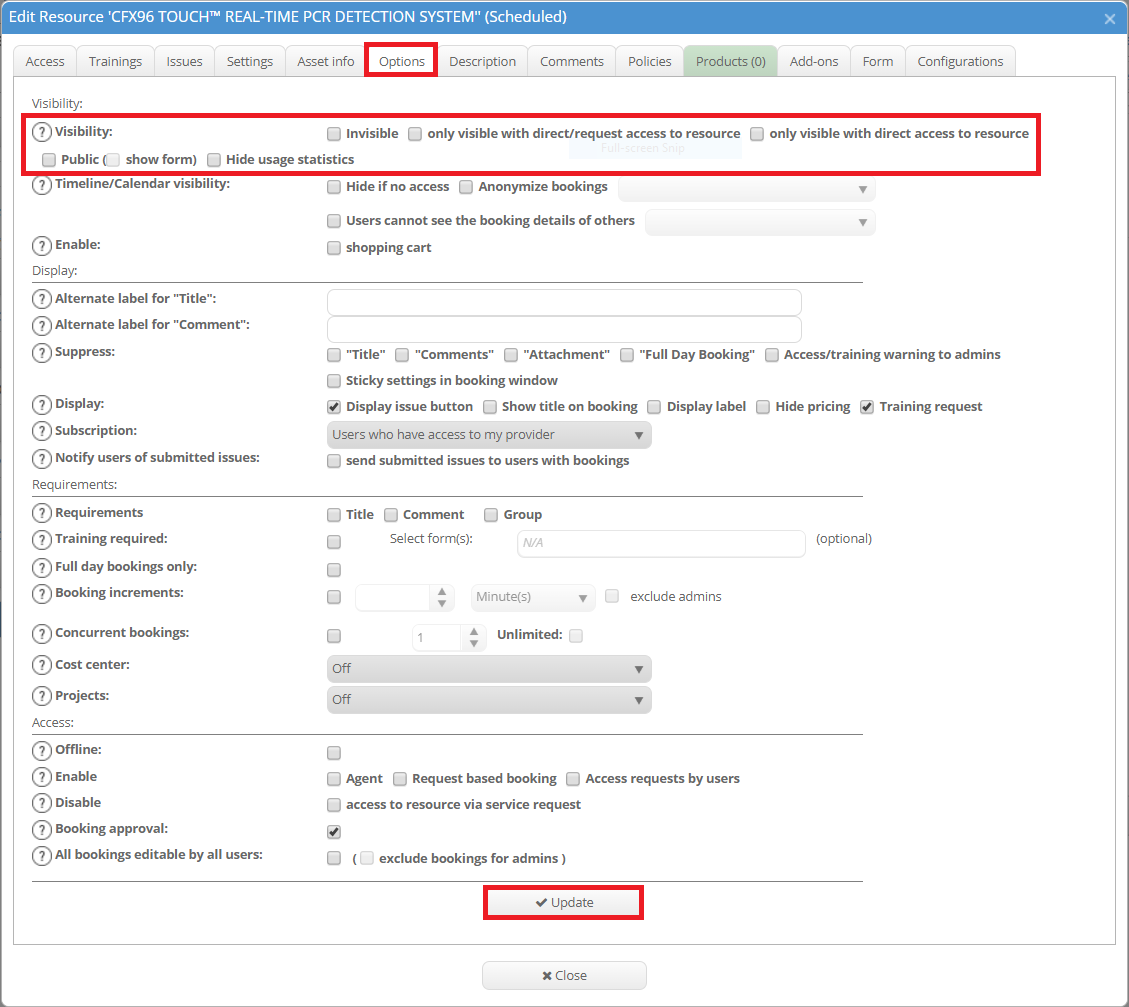
Visibility of resources
The visibility of your resources can be altered in the tab “Options” of the resource settings. The resources of your provider are by default only visible to users with access to your provider or direct access to the resource. Keep in mind, that users which can see are resource are not necessarily able to book it. The section "Access and use of resources" will give you more information on this topic.
Option 1: Access to provider (No additional settings)
If the user has access to the provider, he will see all connected resources if no changes in the settings have been made. Keep in mind that this is the default setting with no tick in the resource visibility settings.
Option 2: Visibility set to “Invisible”
If you tick “Invisible” in the resource visibility settings no one will see this resource. Even for admins of the resource it will be invisible in the scheduler and only be accessible via the tab ADMIN.RESOURCES. People with access to this resource will also not be able to see this resource.
Option 3: Visibility set to “Only visible with direct/request access to resource”
The resource will only be visible to users with direct access (these users are listed and can be administered in the “Access” tab) or users, who are granted access to the resource via an active service request.
Option 4: Visibility set to “Only visible with direct access to resource”
The resource will only be visible to users with direct access to the resource. These users are listed and can be administered in the “Access” tab.
Option 5: Visibility set to “Public”
If this option is chosen, the resource can be seen by the public on the OpenIRIS website without login. But for users that are logged in, the resource is only seen in the scheduler if they do have provider access or any other direct access to the resource. Otherwise the resource is only visible under browse. The button “show form” can only be selected when the visibility is set to public. This means that the booking form or service request form will be publicly visible.
Option 6: “Hide usage statistics”
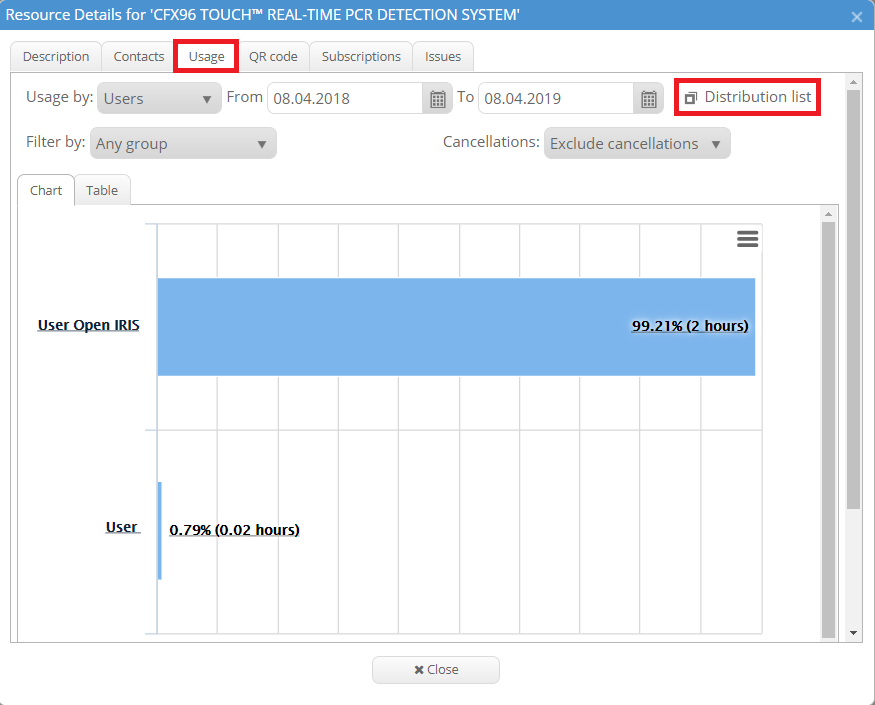
By default, the usage statistics is visible for everyone with access to the resource as well as a distribution list with the email addresses of all users. This can be seen when opening the details of a resource. If this option is chosen, this tab is invisible for everybody. Admins can still see the user statistics in the tab ADMIN.STATISTICS and the distribution list of the resource in the scheduler with the white square.
Option 7: No provider access
If a user has no access to the provider but the access request is enabled in the provider settings by the provider administrator, then the user can send an access request to the provider. Once approved the user is able to see all resources.
Timeline/ Calendar visibility
The visibility of timeline and calendar can be altered in the tab “Options” of the resource settings. By default, the timeline and calendar of a resource are visible to any user.
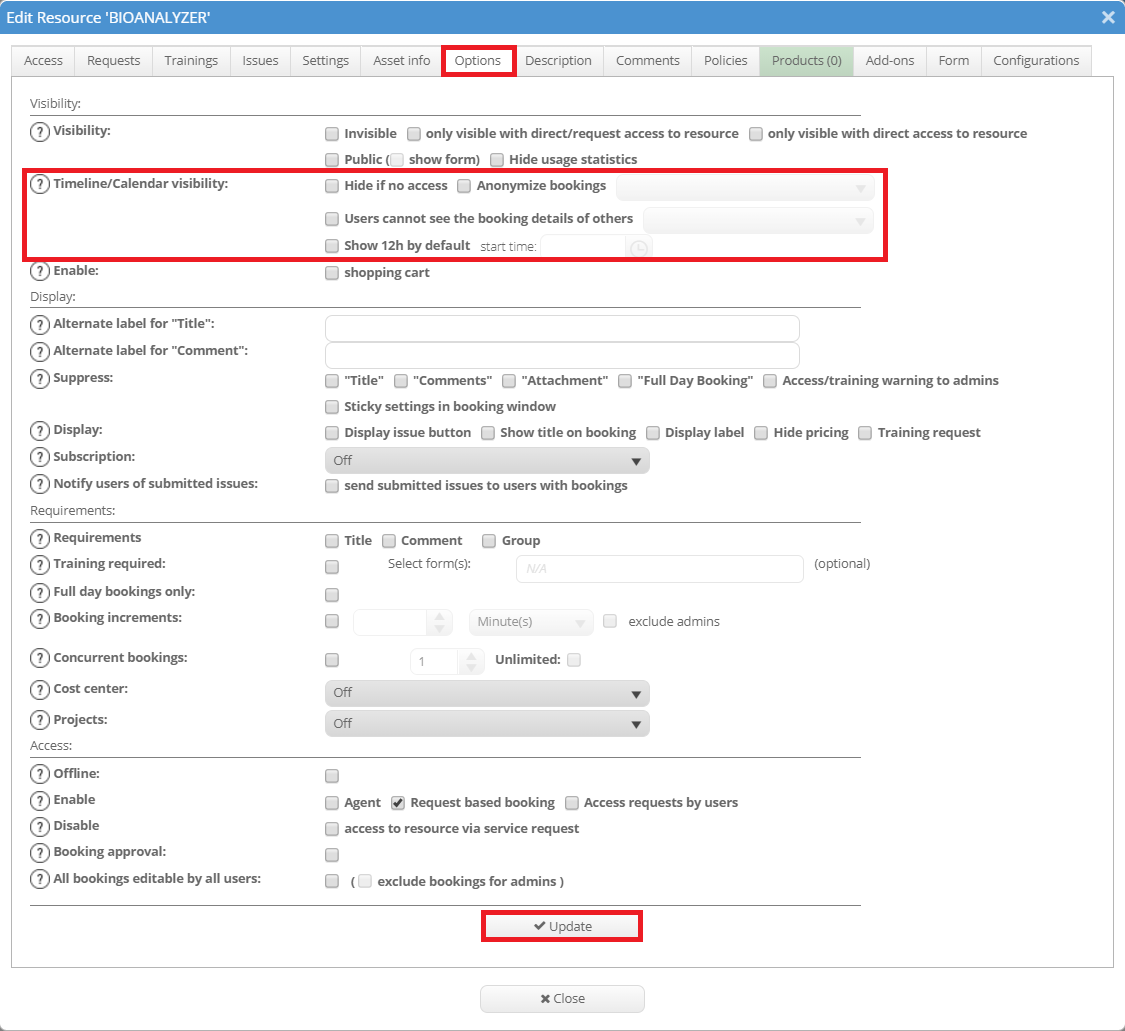
- Hide if no access: The timeline and calendar will not be shown to people who do not have access to this resource if this option is chosen.
- Anonymize bookings: This option allows to anonymize bookings in timeline and calendar. Only for your own bookings the name will be shown. All other bookings are just shown by empty boxes.
To anonymize bookings you can select between: "if no access" (people with no access will be shown an anonymized timeline), "always" (every user except the admins sees an anonymized timeline), "if booking is from a different organization" (booking will be anonymized if user belongs to a different organization) or "if no access + if booking is from a different organization" (combination of both). - Users cannot see the booking details of others: If this option is enabled bookings details are not visible to other users. The choices of the dropdown menu are the same as for the anonymization of bookings.
- Show 12h by default: With this setting the timeline will be shown in a 12 hours format instead of a 24 hours format by default. Users can change this manually for themself if preferred. Additionally the start time of the 12 hours can be set. The default start time is 8 am.
Access and use of resources
Users who see your resource do not necessarily have access to it. There are multiple options on how access can be granted and how users can use your resource.
Direct access
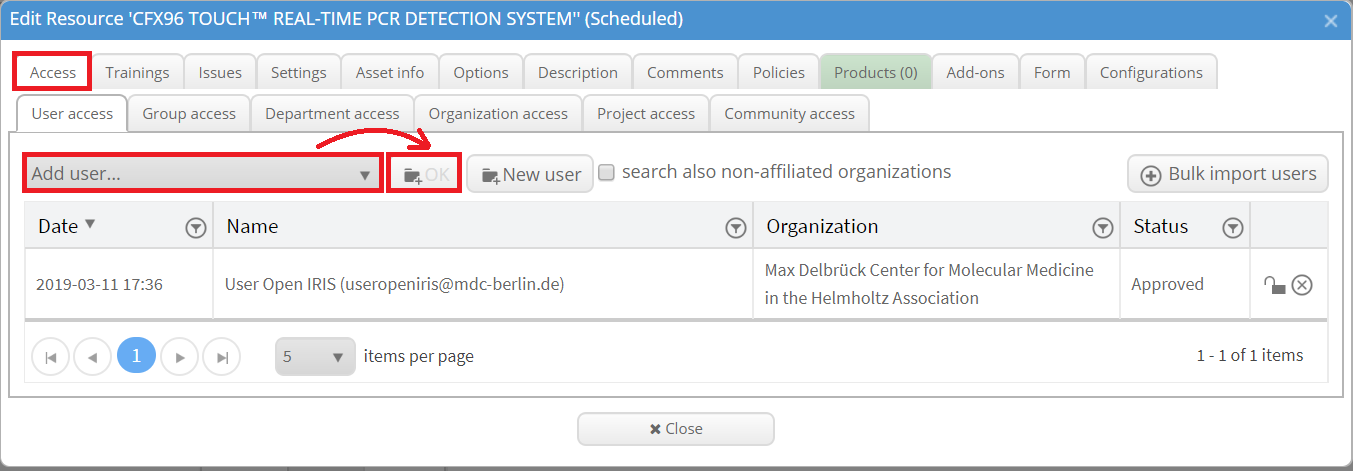
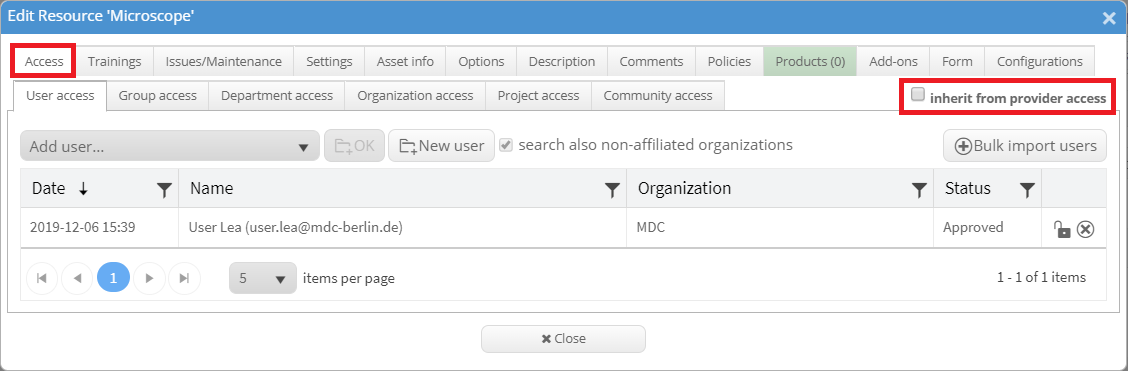
The direct access of individual users can be granted in the “Access” tab of the resource settings. By clicking on the “Add user…” drop-down and either choose one of the proposed users or enter the email address of the user, that should be added. After selecting one, click on the “OK” button.
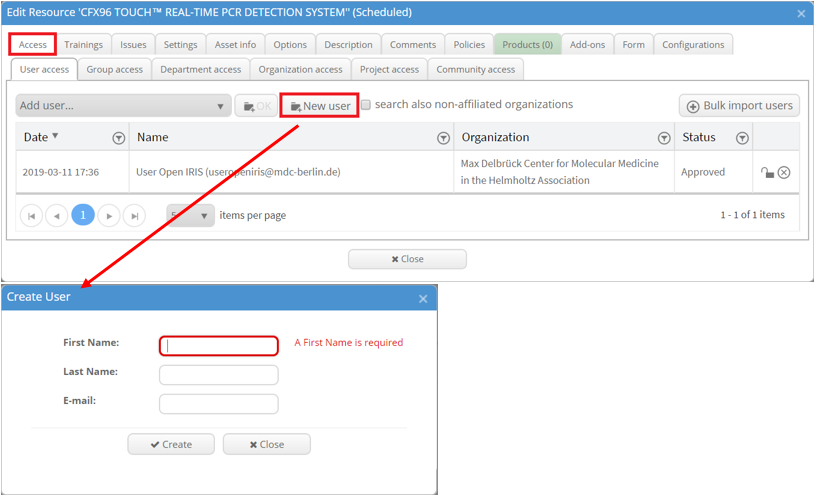
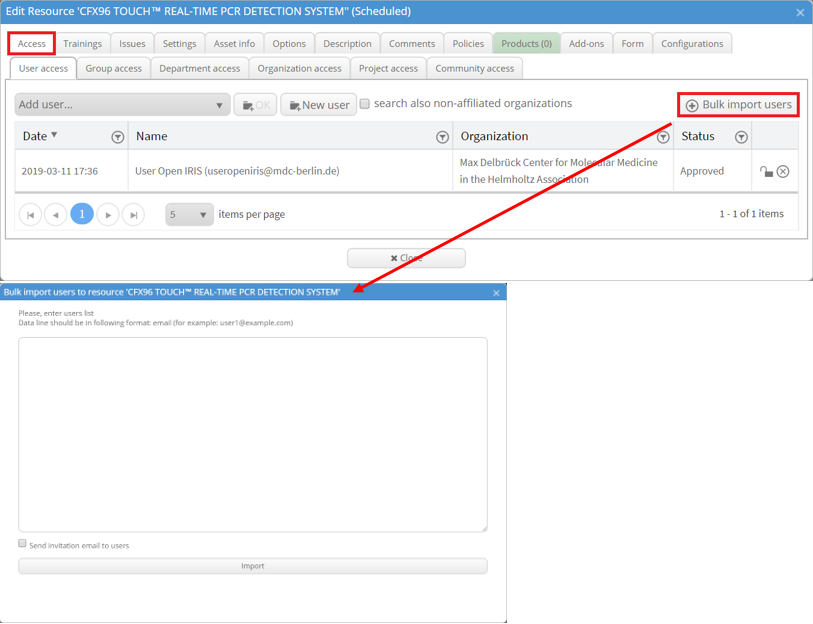
There are also options to add new users, search for users from non-affiliated organizations and to bulk import users. This allows you to grant access to users who do not have an OpenIRIS account. It is also possible for users with no provider access to get direct access to a resource. Then this will be the only visible and accessible resource from your provider.
You can grant access to whole groups, departments, organizations, projects and communities in the same way.
It is also possible to inherit the permissions from the provider access settings by ticking the button "inherit from provider access" in the access tab. When selected all access tabs are grayed out.

Access request
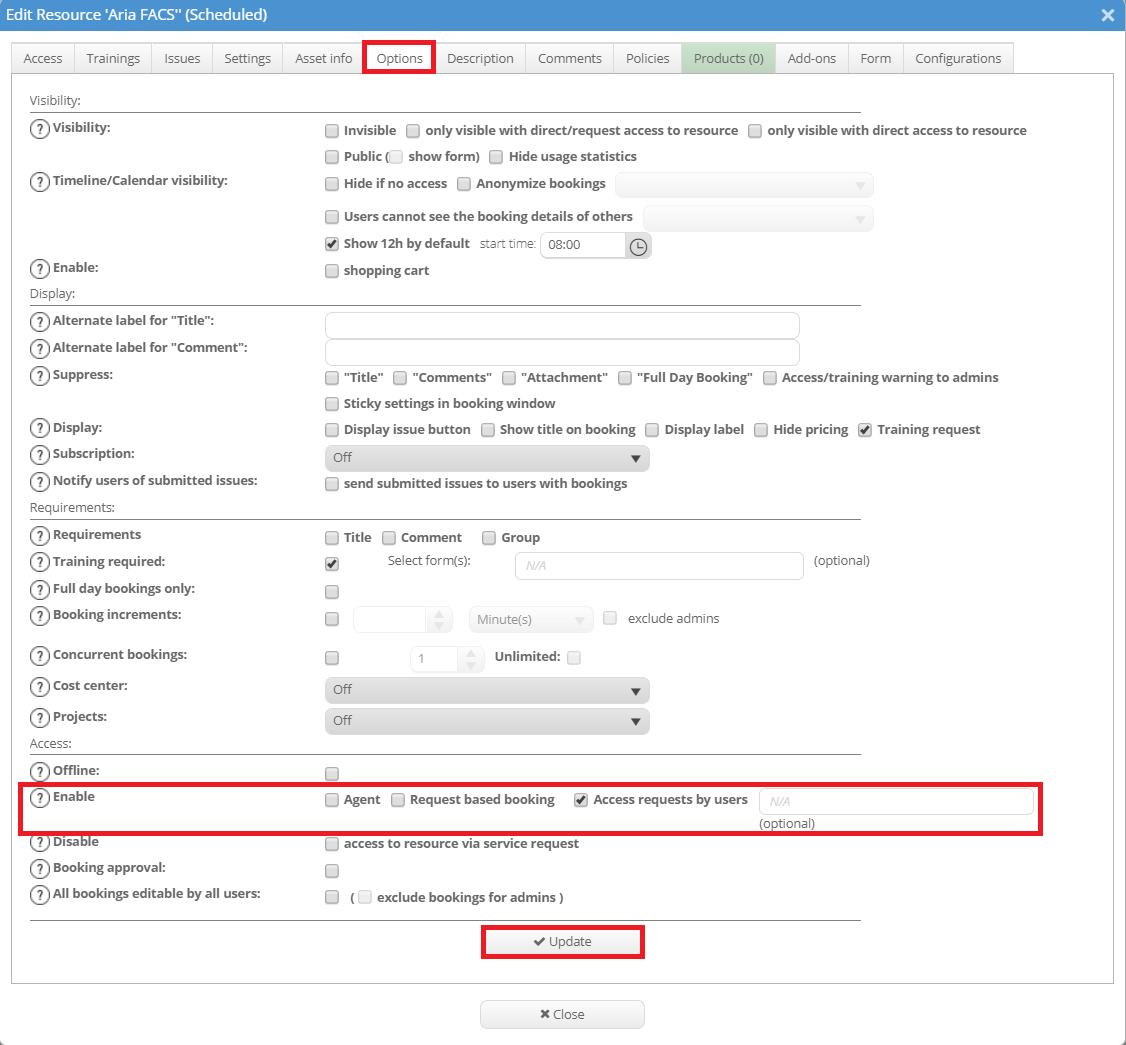
In the “Options” tab it is also possible to tick the button “Access request by users”. This enables users which do not have access to this resource to send you a request to access you resource. How they can do this can be found here. Additionally it is possible to optionally add a form to the access request.
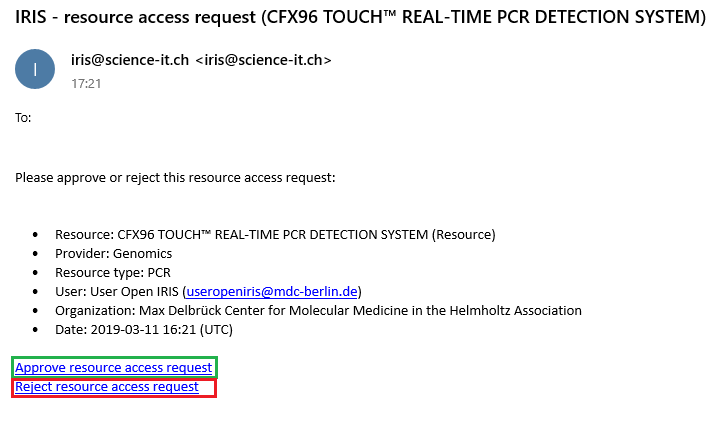
After a request was submitted you will get informed by email. In the end of the mail you will find links to directly approve or reject this request.
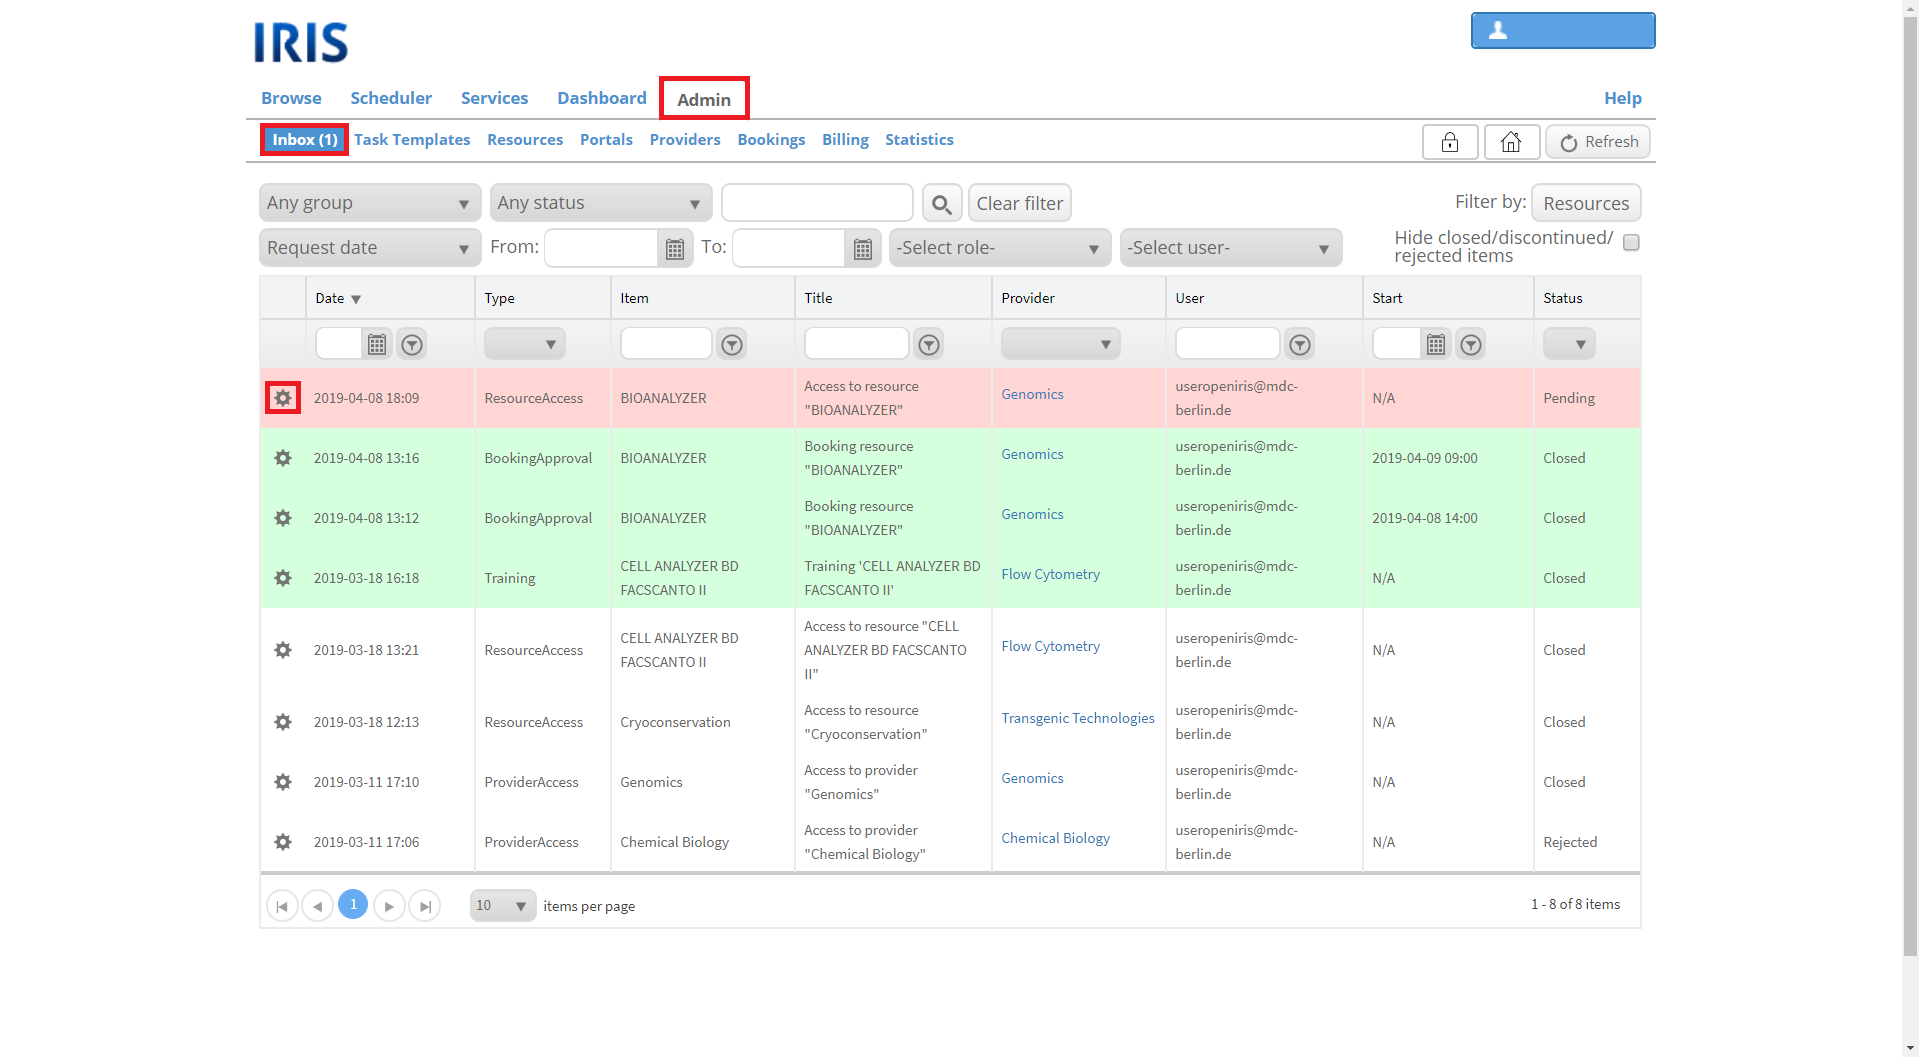
You can also answer requests in the ADMIN.INBOX by clicking on the gear wheel. There you can also edit all previous request and change their status.
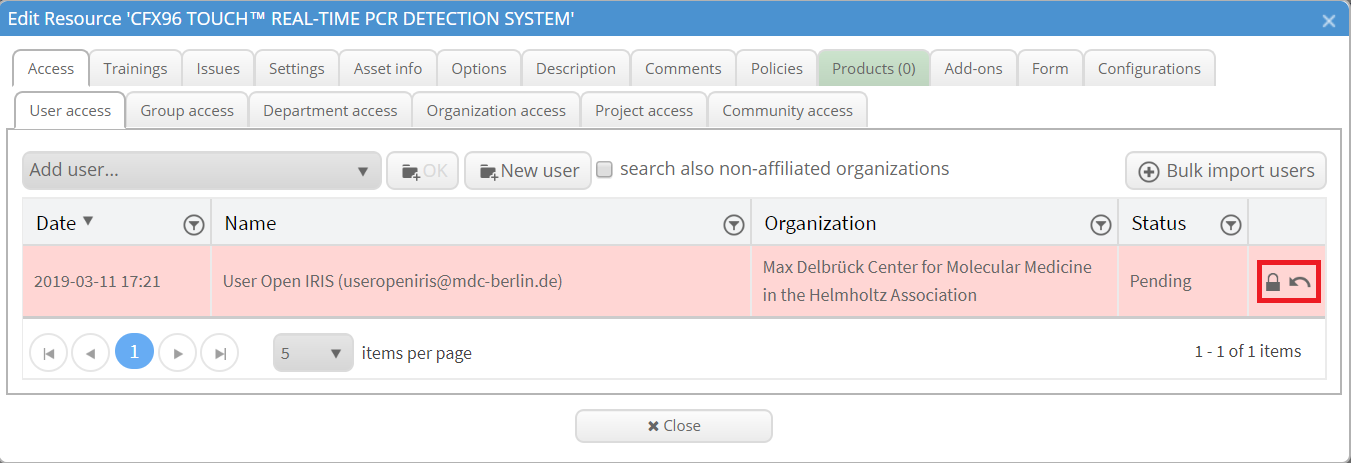
Additionally, you can answer this request in OpenIRIS in the tab “Access”. You will find all requests marked in red. On the right you can either accept the request by clicking on the lock symbol or reject it by clicking on the arrow symbol. The user who send the request will automatically be informed.
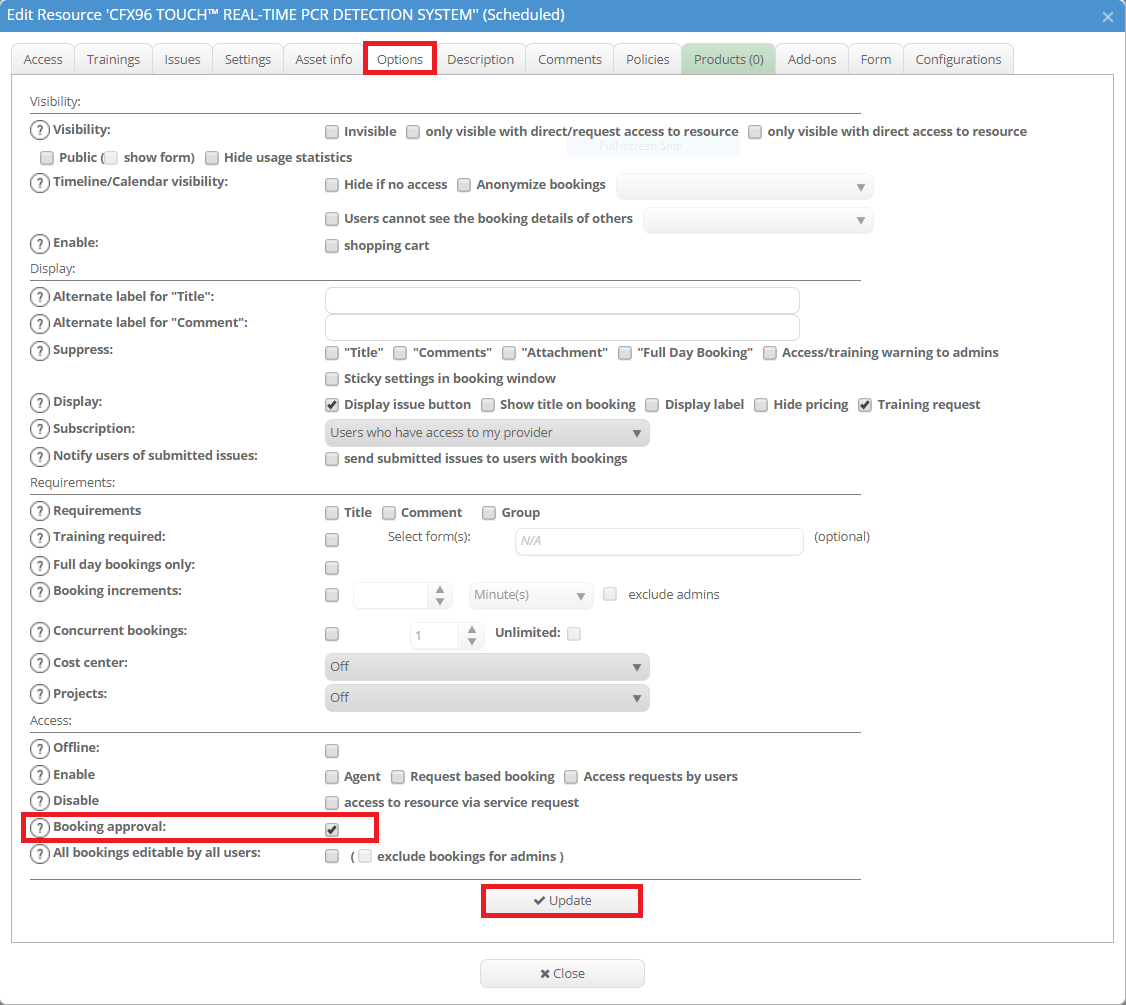
Booking approval
When ticking the box “Booking approval” at the bottom of the “Options” tab, users can send a booking request each time they want to book your resource even, when they do not have access to. Every booking request needs to be approved by an admin. But once the users have a direct access to your resource the booking does not need approval anymore. You will be informed about every booking request via email. The user will be automatically informed when you approve or decline the booking request. Please keep in mind that the admins can also change parts of the booking prior to accepting it. A repeated booking only needs to be approved once by the admin. If the user changes an approved booking a new re-approval in needed.
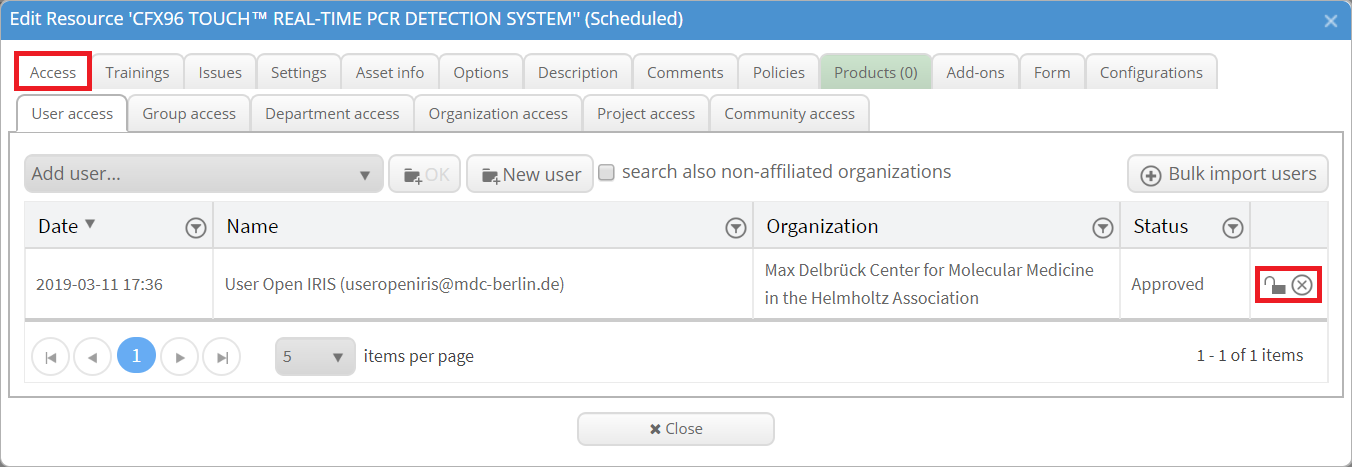
Administrate access of users
All users who have access to the resource can be administered in the tab “Access”. By clicking on the symbol with the open lock you can disable the access of the user to this resource. The user will still remain in this list and can always be re-enabled to use the resource. By clicking on the x symbol you can remove this user completely from using your resource. The user will then no longer appear in the list. However, the user can (if the option is enabled) still send access requests for this resource in the future. To read how an access request works click here.
Request based booking
There is also the possibility to allow booking only after a request. This means that by default no one has access to your resource even when it is visible. However, a request to book this resource can be send via the corresponding service. If admins accept this request, the user will be able to book the resource for a defined period of time. When this period of time runs out the request can either be prolonged or left to run out.
To have this option you need to enable "Request based booking" in the "Options" tab. Please keep in mind, that users with direct access to your resource will not need a request to make bookings.
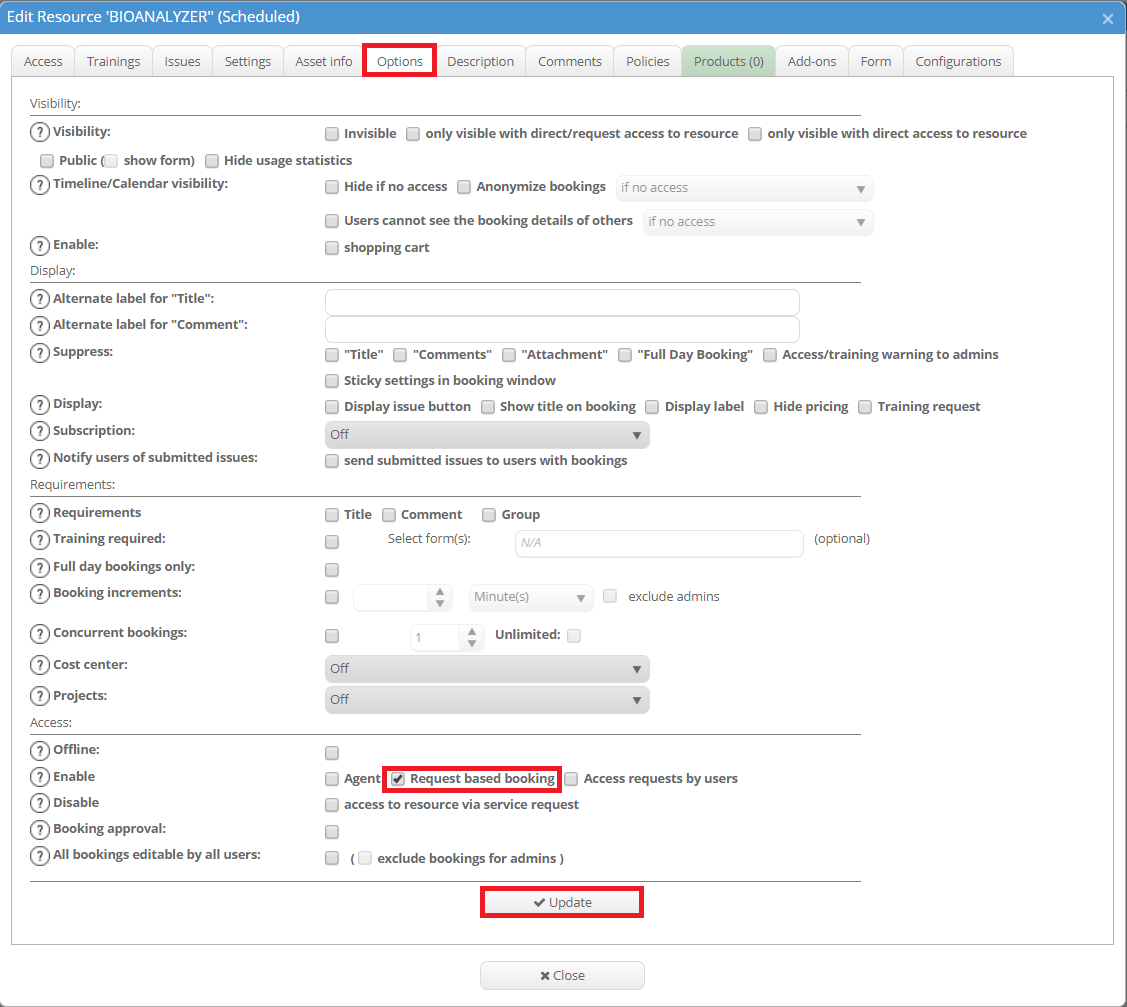
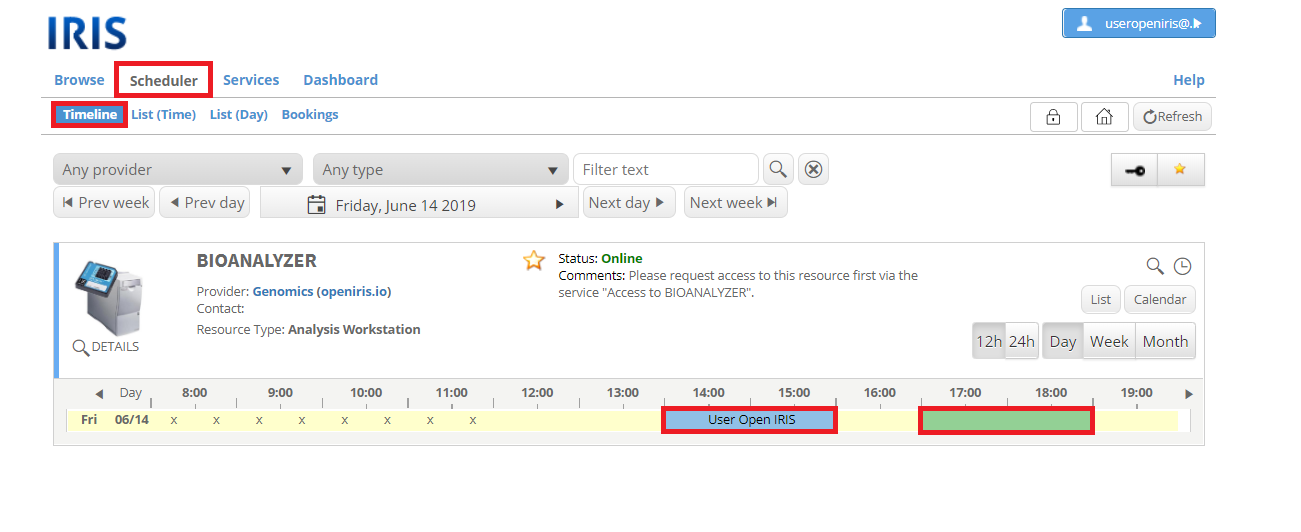
Additionally, a new service needs to be created over which the requests are inquired. In the following example the request based booking is enabled for a bioanalyzer.
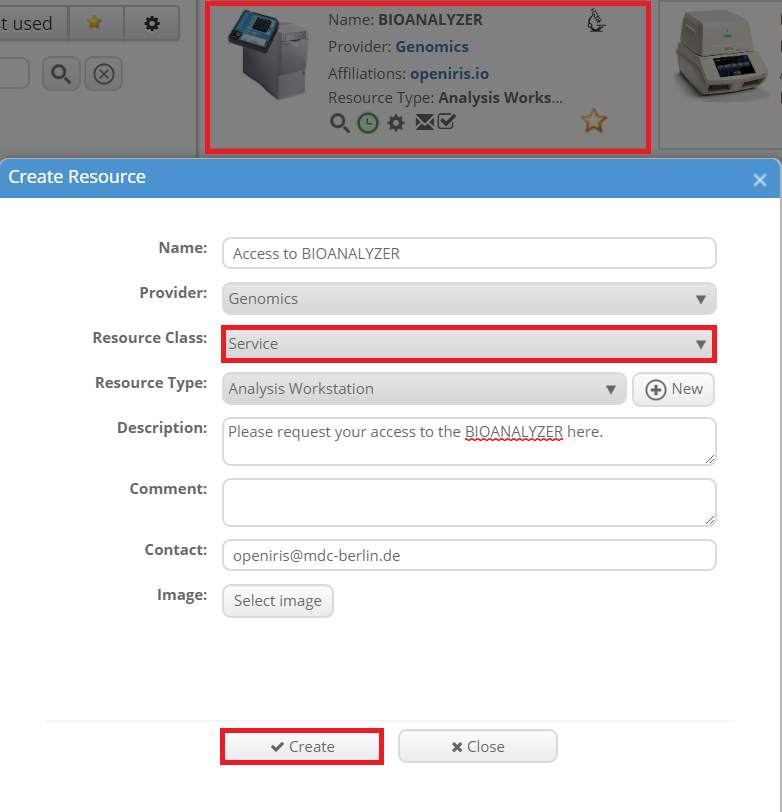
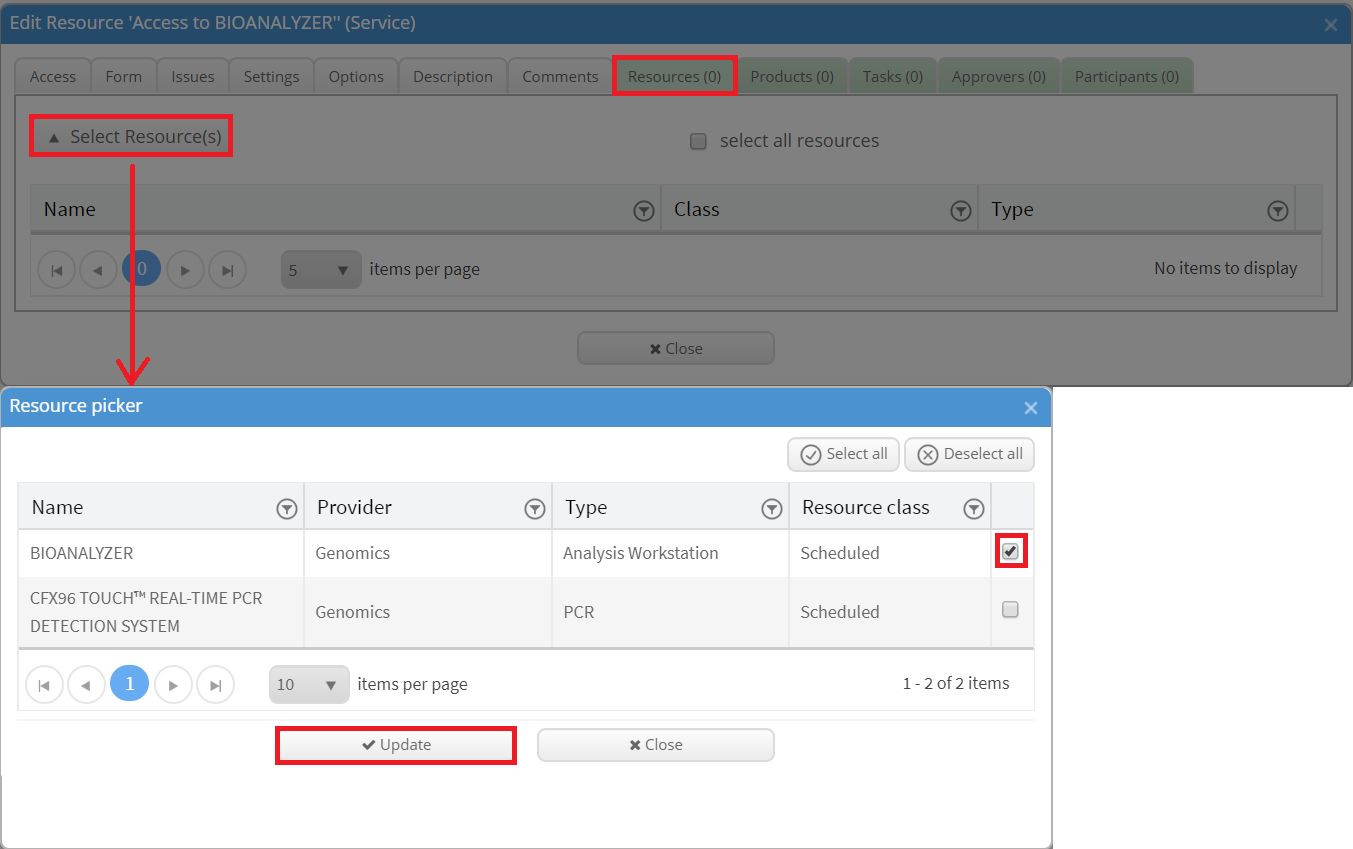
This service needs some additional settings to function as a service request for one or multiple resources. First of all, the corresponding resources need to be added to the service. This can be done in the "Resources" tab. The number in brackets shows how many resources are already linked to this service. When clicking on "Select Resource(s)" all resources for whom you are an admin are showed. Now you can select and deselect as many as you want. But do not forget to click "Update" in the end.
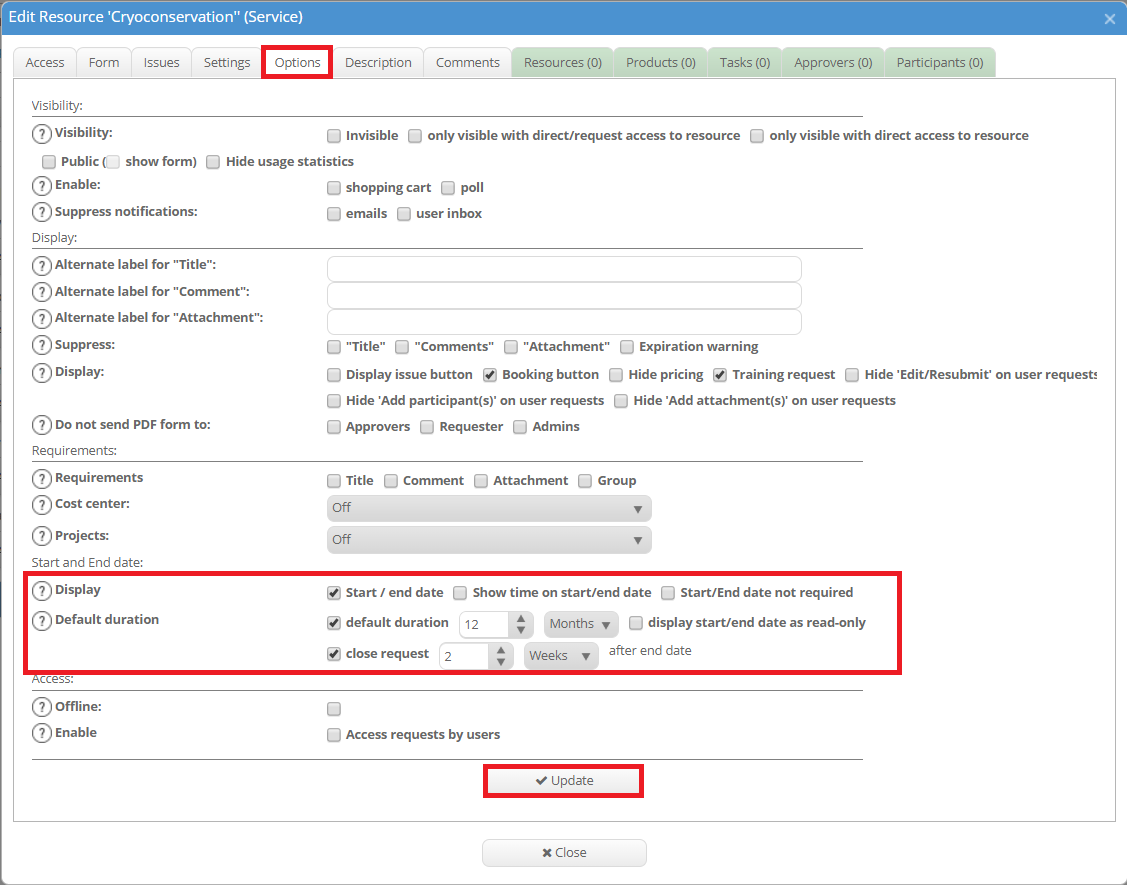
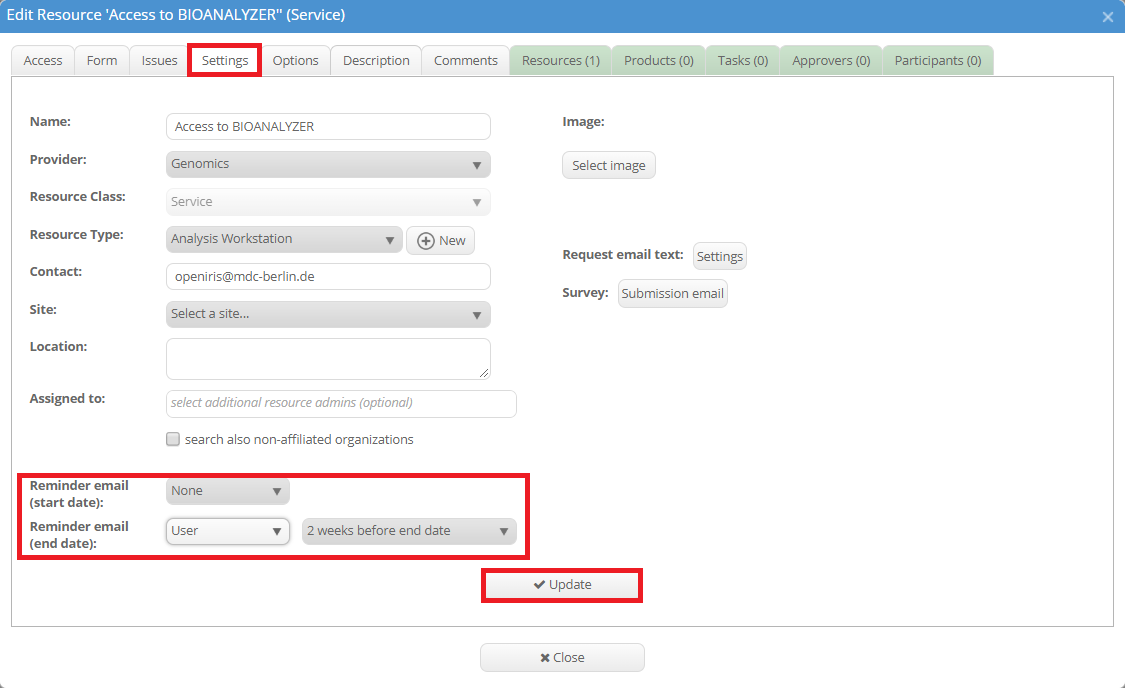
Additionally, you can display the start and end date of this request in the "Options" tab. Then you can set the default duration of a request and when the request should be closed if no extension was made. In the "Settings" tab it is possible to enable remainder emails for the start or/and the end date.
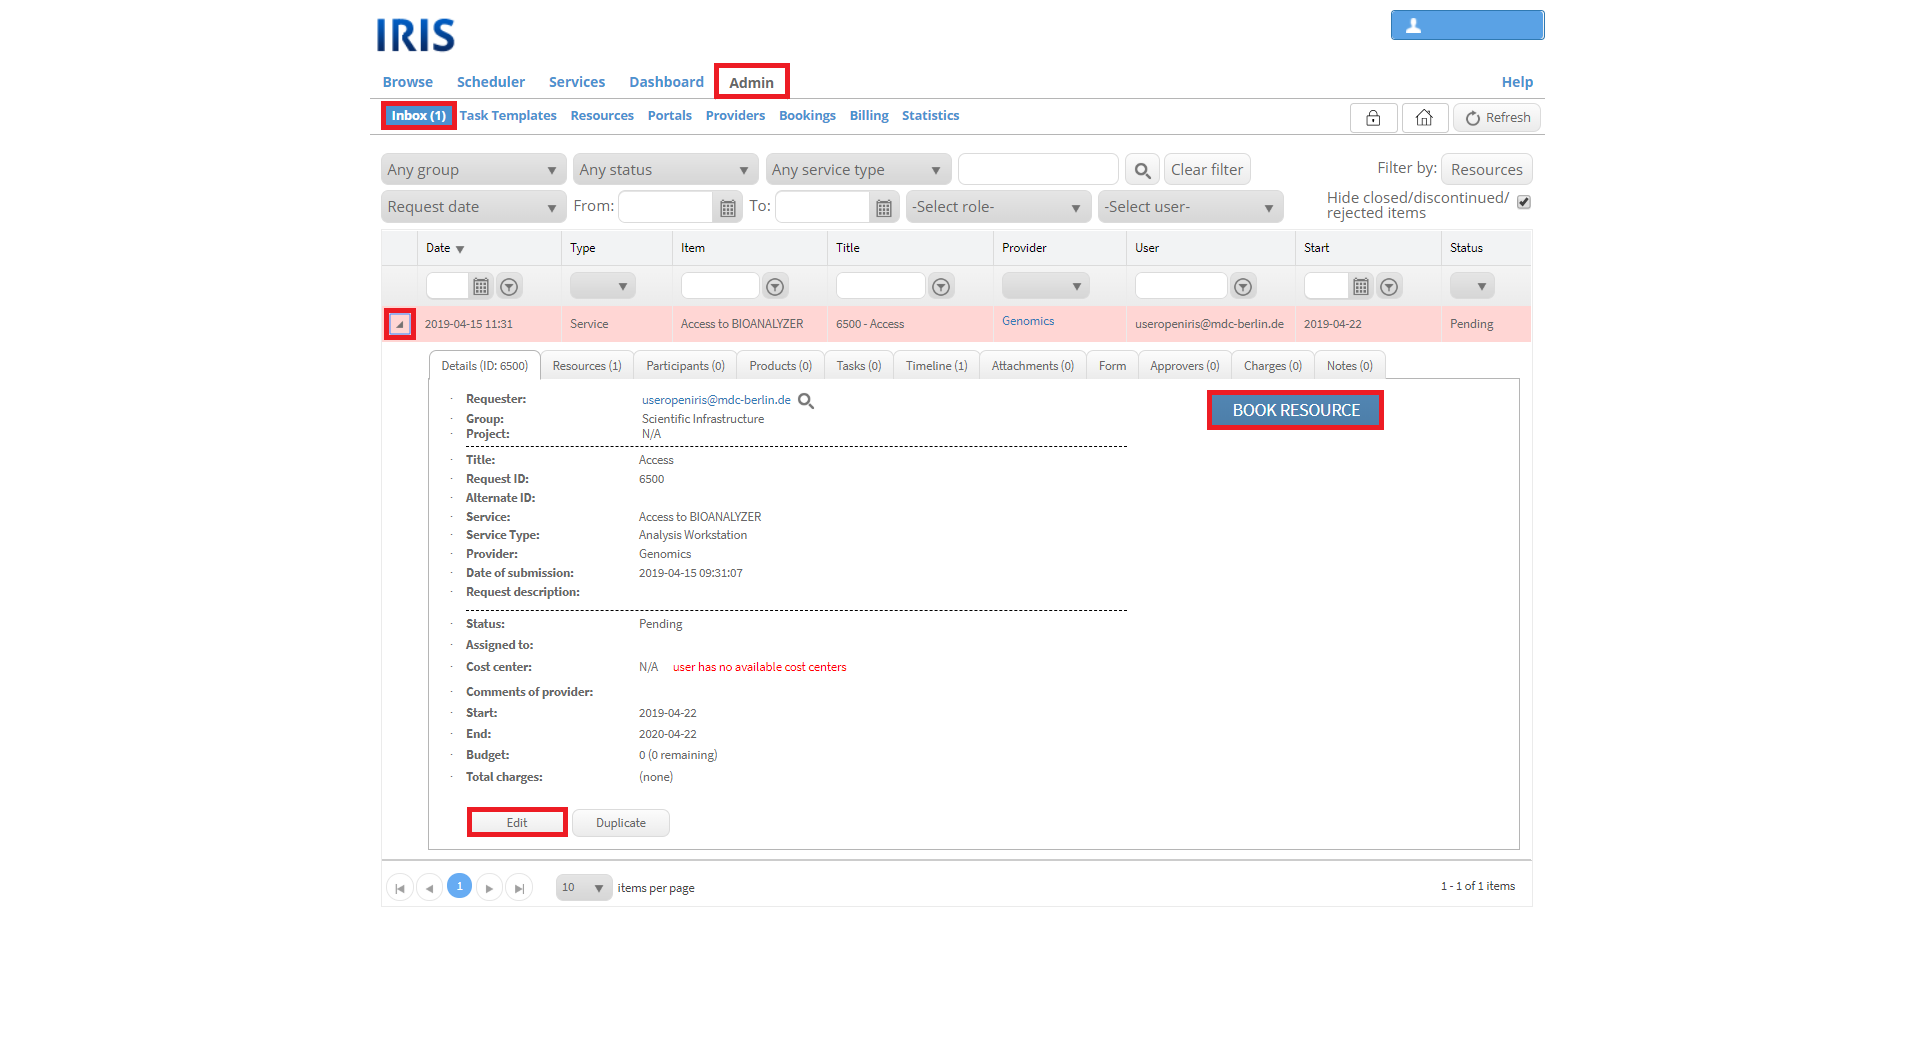
Now everybody who has access to the service can send a request for your resource. If a request is send you will be informed by email. Now this user is visible in the ADMIN.INBOX (marked in red as the status is still pending). By clicking on the little triangle more options become visible. You can now make bookings for this user and change the settings and status for his request. If the status is changed, the user will be informed automatically by email.
If you want to get additional information from the users, you can add a form for the service in the "Form" tab. This form will then be shown to every user who wants to send a request. The request can only be send if all required fields are filled out. Please keep in mind that this does not change anything for the users who have already send a request. To read more on how to create a form click here.