CellProfiler on Ukko2 cluster
This page shows how to run CellProfiler on Computer Science department's Ukko2 cluster (OBSOLETE - Ukko2 User Guide). You need to learn a few things to get it working, but the time investment may pay off if you have lots of plates to process.
- To get access, see: OBSOLETE - Ukko2 User Guide.
Motivation
When analysing Molecular Devices Nano data (2048x2048) on LMU HCA workstation you can run only 6 workers before getting memory problems. On Ukko2, a modest resource request that based on the testing done so far is usually granted immediately is 4 nodes (sometimes the job would be in queue for maybe 5 minutes). One node has 28 cores, giving 112 cores in total. At the moment there is some problem when trying to use all cores, but using even just half still gives 56 cores (CP workers). How many of those will actually be used depends also on the data set size. For a test data set of 144 images sets the processing used 12 cores on each of the 4 nodes (total of 48 cores), with each core processing 3 image sets. The pipeline was reasonably heavy, with texture measurements etc., and the run would take 10-15 minutes. In this case the time it took to process one image set was about the same on Ukko2 and HCA workstation. The benefit of Ukko2 was that you would get 8 times more images processed simultaneously. A speedup like this could be quite significant: analyses that you used to let run over night could now be repeated several times times during the day with different parameters.
Mount Ukko2 folders on the local computer
There are two important folders on Ukko2: $WRKDIR and $PROJ (see OBSOLETE - Ukko2 User Guide). You need to copy your image data in the $WRKDIR directory. In $PROJ you can store the scripts needed to start the computation, and also the results. Here's how to access the folders on your local computer.
On Windows:
To mount $WRKDIR, type \\ukko2-smb.cs.helsinki.fi\YOUR_UH_USERNAME in File Explorer.
To mount $PROJ, type \\nas-fs2.cs.helsinki.fi\proj\YOUR_UH_USERNAME in File Explorer.
On Linux (and probably also on Mac) you can use sshfs:
mkdir /home/hajaalin/ukko2-wrk/
sshfs ukko2.cs.helsinki.fi:/wrk/hajaalin /home/hajaalin/ukko2-wrk/
sshfs ukko2.cs.helsinki.fi:/proj/hajaalin /home/hajaalin/ukko2-proj/
Modify your pipeline
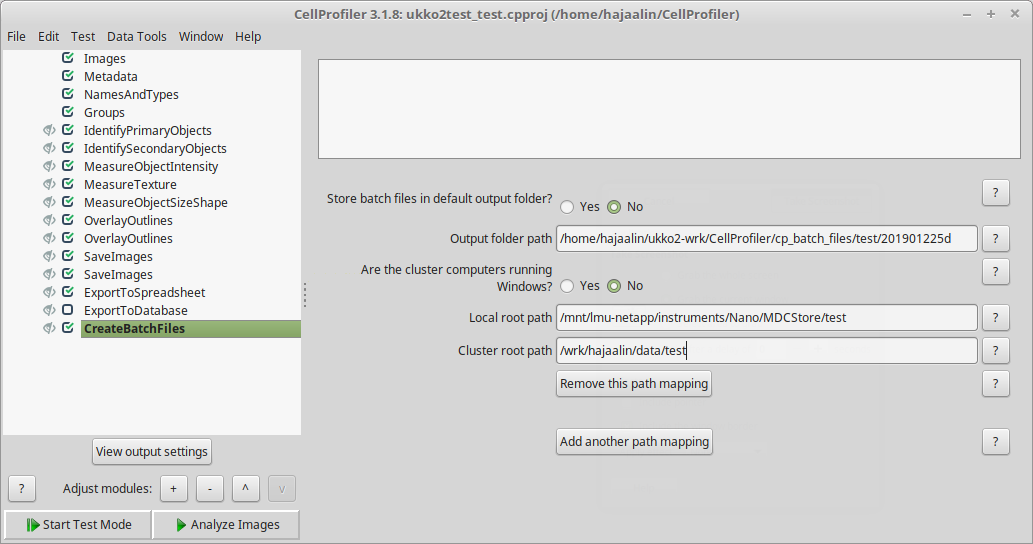
You can still build and test your CP pipeline in the usual way with the GUI. The main difference is that you need to add "CreateBatchFiles" as the last module. When the pipeline is ready and you click "Analyze Images", instead of actually running the analysis, CreateBatchFiles will create a file that contains all necessary information for running the pipeline on the cluster. For this to work, you need to provide a mapping between the image data paths on your local machine and on the cluster (see screenshot).
Other points about the pipeline:
- Use "Default Output Folder" in all modules that write results.
- ExportToDatabase using SQLite does not work on the cluster.
- ExportToSpreadsheet works.
- Close all the "eyes", just in case.
Create batch job scripts
Starting compute jobs on a cluster is a bit different from running it on your own desktop (see FAQ & Scientific Software Use Cases):
- The jobs are started on Linux command line.
- You need to create a batch job script that describes how to run your analysis.
To make things a bit easier, you can use a Python notebook provided by LMU to create your batch job scripts. Learning to work with Python notebooks can also be useful for analysing the results.
- Set up Jupyter Notebook (see Jupyter Notebook quick start).
- Download LMU example notebooks from https://github.com/UH-LMU/CellProfiler_notebooks (download all files in one folder).
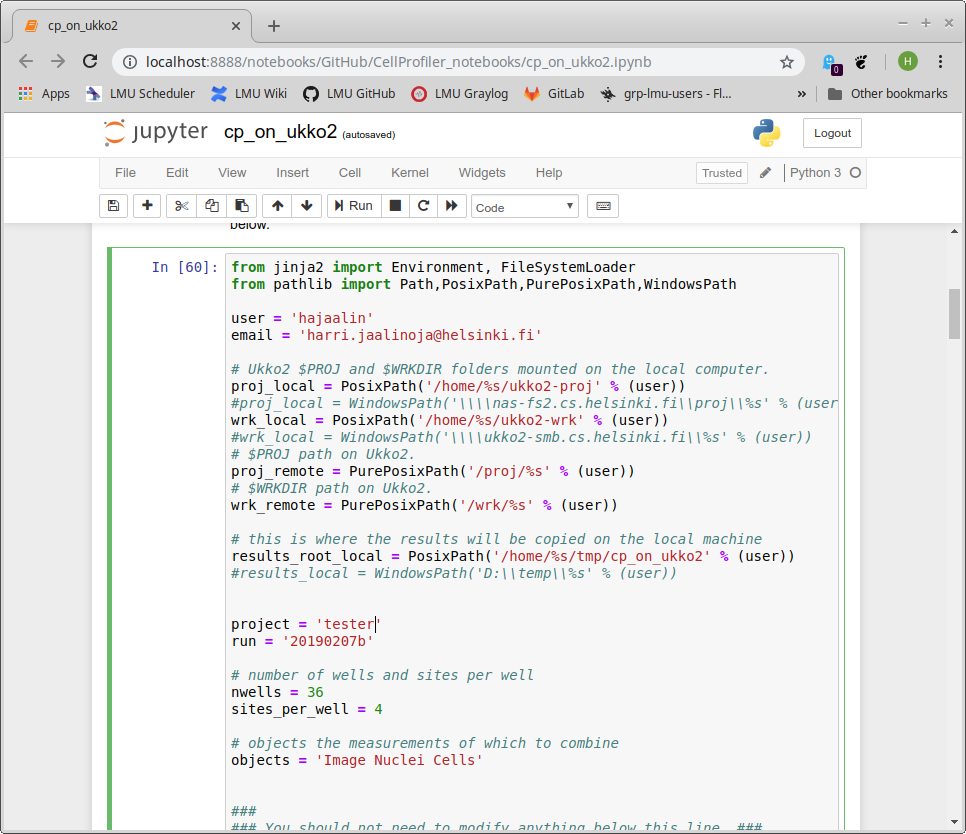
- Start the notebook "cp_on_ukko2.ipynb".
Now you have to modify the script to your situation:
- Change 'user' to your university username.
- Set your email address (in the hope that email notifications start to work, at the moment they don't).
- Change the data folders.
- Change the 'project' and 'run' names. These will be used to name the output folders.
- Change the plate setting.
To run the script, press "Shift+Enter". This should create a folder with the batch job script in Ukko2 $PROJ. The script also prints out the command you need to run on Ukko2 to submit the job.
Submit the batch job
First you need to log in to Ukko2.
On Windows:
- Start Menu → Find → putty
- For Putty instructions see https://www.ssh.com/ssh/putty/windows/#sec-Running-PuTTY-and-connecting-to-a-server
- HostName = ukko2.cs.helsinki.fi
On Linux and Mac:
- Open a terminal
- Type "ssh ukko2.cs.helsinki.fi", press Enter.
Once you have the Ukko2 terminal open, go back to the notebook and copy the command it printed out. Paste the command in the terminal and hit Enter.
If this step proves too cumbersome for users, it should be possible to make it work from the notebook with the following steps:
- Create an SSH key pair.
- Create a script that finds and runs the newest sbatch script in a directory (also check that output files don't exist yet).
- Copy script to Ukko2.
- Allow SSH connections using the key previously created to run the script.
- Use paramiko to make SSH connention and run the script.
Collect the results
The notebook "cp_on_ukko2.ipynb" contains further cells that implement the following tasks:
- Copy the results from Ukko2 to the local computer.
- Modify image file paths (from Ukko2 to the local environment).
- Combine all object measurements in one .csv file.
- Create a .properties file for CellProfiler Analyst
Once you run all the cells in sequence, you should be able to view your results with CellProfiler Analyst by opening the .properties file created in the last step.