Label Designer
Page In Finnish: Etikettityökalu Label Designer
NEW: interactive Thinglink guide for the tool
A new interactive guide for LabelDesigner has been created: https://www.thinglink.com/scene/1623665417702604802
Label Designer is a tool used in Kotka and in Notebook (Vihko) to design and print labels.
You can start from scratch and design an entirely new label. You can also use pre-defined label templates as they are or as a starting point for your design. The tool allows you to use specimen data from Kotka, import data from a file or generate label data in the tool. You can e.g.
- define the size of the label
- choose which data fields you want to include and position them on the label
- format the field texts in multiple ways
- add headers and other texts
- adjust borders and margins
- define a certain text to be shown on the label instead of a particular field content.
Saving label designs is possible as well as using previously saved label designs you or someone else has made and shared with you. See below for further details on the menu items and features and a quick guide to make basic labels.
For Using Label Designer outside Kotka or Vihko, together with your own Collection management system or as a standalone app, see https://luomus.github.io/label-designer/index.html for more information.
Menu and edit area
Editing/design area
Here you can adjust the size of the label, by giving its height and width in mm (minimum size 4*4mm).
File
Here you can start a new label, save your label designs (.label file), load a previously saved design from a label definition file, see your own recent label templates and see pre-defined label templates. If you save your label design, you can also share it with someone and they can load it to the application. Here you can download the label PDF and can also generate specimen data for the labels or import data from an XLS, CSV or ODS file.
Edit
Undo and redo buttons. The application remembers last 20 changes.
View
These options are especially useful when making small labels. You can magnify the editor and the preview, go to full screen mode or choose to show a grid to help with the design. You need to choose "show grid" and then the desired grid size.
Label fields
Here you find all the data fields available for labels. You can filter the available fields in the search. Add fields to the label editor either by dragging and dropping or clicking the arrows. If you need to add fields to the backside of the label, either drag and drop or check "Add fields to the backside" and then click the arrows. The tool contains fields that have previously been used for labels in Kotka (so not all possible data fields are included). For some fields there are options with the data formatted in different ways (e.g. Date with Roman, Date with abbr. month). If there are fields needed for labels that are missing from the list of available fields, please contact kotka(at)luomus.fi to request for field additions.
QR code that includes the full URI identifier can be added to the label design also from the list of available fields. It is not possible to include a QR code that would only include the latter, so called Qname part of the identifier. It is not recommended to make QR codes smaller than 10*10mm, otherwise their readability can not be guaranteed.
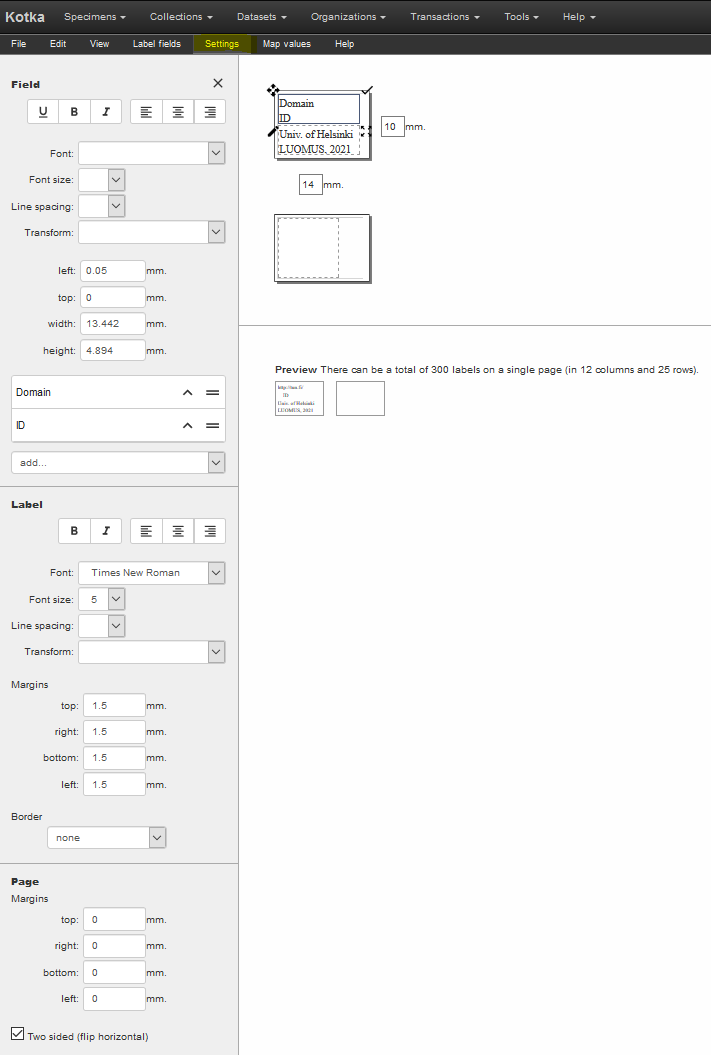
Settings
In settings you can adjust various things – separately for each field, generally for the whole label and for the whole page, including two sided labels. Adjust for example the page and label margins to fit more or less labels on a page. Or add borders for labels, define a font for all the labels, but use a larger font on a certain field. In the field settings, you can also use the add –option to combine different data fields to the same field area on the label, and choose how the information in the different fields is separated, which prefix and suffix is used and how they are formatted. Field sizes and positions can be adjusted also by clicking a field active on the editor and using the handles in the corners of the field.
Settings made per field will override setting made for the entire label.
Map values
Under Map values you can choose how a certain field content is to be shown on the label. For example, you may want to always show “(U)” for the Biogeographical province if it says “Uusimaa” or “Nyland” or “U/N” in the data itself.
Quick steps to make basic labels for specimens in Kotka
- Go to Specimen search in Kotka. Make a search that includes the specimens you need to print labels for. Labels will be printed for all documents of the record type Preserved specimen (not for observations). Click Print labels → Label Designer to go to the tool. (Note, you need to have narrowed down the search to 500 or less specimens to be able to print labels)
- If you want to start from scratch, choose New (under File). Start by giving the size of the label to the fields next to the label in the editor. You can change these any time.
- Go to View and choose to show a grid to help you place the fields.
- Choose the fields you want to have on the labels from the Label fields –menu. Drag and drop the fields you need in the editor and adjust their sizes and positions any time.
- Go to Settings. Adjust settings (e.g. font, margins, borders, text alignment etc.) for the whole printing page, all labels and individual fields. Click to activate a field in the editor to manage its settings.
- In the preview under the editor, you can all the time see how the labels are going to look like with your data. You can preview different specimens using the arrows. You can magnify the preview under View.
- Once you are happy with the design, go to File and save your design file for later use. Then download the labels as a PDF file to be printed (File → Labels → Download labels (pdf))
Sharing label designs in Luomus
In Luomus, you can use network drive folders under P:\h978\public_all\LabelDesigner to share label designs with colleagues.
Short introduction video in Unitube
Label Designer was introduced in a webinar for Kotka users, and recording was published in Unitube (in Finnish): https://www2.helsinki.fi/fi/unitube/video/80fdd3c6-d794-40e4-8973-571a97563cac
Known issues
- In field settings, when adding more fields to existing text areas, the setting menu does not always open