Specimen images
Page in Finnish: Näytekuvat
General
Specimen images can be saved to Kotka in two ways:
- One image for one specimen at a time
- Mass import of hundreds of images for several specimens at the same time
The images should be saved as large files as possible: Kotka is able to make them smaller and suitable for viewing and also allows you to zoom the images. Maximum size for one image is 10 megabytes. Jpg, png and tif are permitted file formats.
Please note that images are public, so make sure there isn't anything that would give hints about the location of a sensitive species.
Saving images for single specimen
- First enter and save specimen data to Kotka. Then go to the editing site of the specimen, where you can either drag the image file to Drop files or click Drop files, which opens a window where you can browse for the image on your computer.
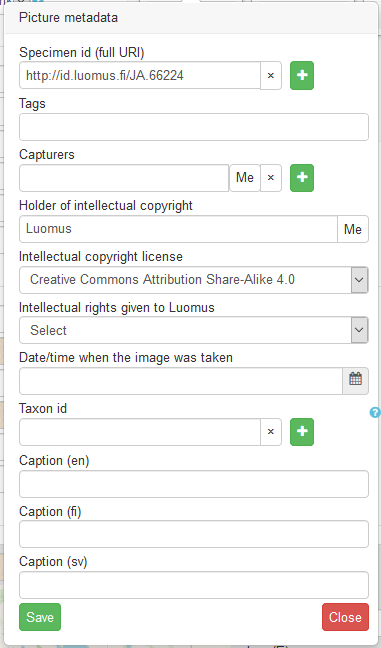
- Wait for Kotka to save the image. Then a window will open where you can record metadata of the image:
- Specimen ID (Full URI): Id for the specimen you are editing, is automatically filled in. You can add other specimen IDs using the green + button, and this way connect the image to other specimens.
- Tags:
- specimen: for images of preserved specimen
- primary: primary image for the taxon, shown in laji.fi on species card, general description, if image also includes a taxon ID and is linked to a taxon
- label: label images are not shown as observation images in laji.fi
- habitat: habitat images are shown on gathering level in laji.fi
- Carcass: crude or bloody images of carcasses or such, that will not be displayed publicly at all.
- skeletal: Images of skeletal specimens. Images with this tag are shown on species card, on media tab under heading specimen images, but are not shown on overview tab even if other images don't exist.
- microscope image: tag to separate microscope images
- drawing: tag to separate drawings
- Capturers: the capturer's name in the form "Lastname, Firstname". If there are several capturers, add each of them by clicking the green plus-button.
- Holder of intellectual copyright: who has the image copyrights, Luomus by default.
- Intellectual copyright license: here you can choose the rights that allow others to use the image. There are many Creative Commons license options and some others. By default Creative Commons Atrribution Share-Alike 4.0 is used. Check default
- Intellectual rights given to Luomus: here you can choose, with what rights Luomus can use the image, if the rights belong to someone else than Luomus
- Date/time when the image was taken: If Kotka hasn't automatically filled this, then mark down the imaging date (by clicking the calendar; usually done automatically from the image exif metadata).
- Taxon id: identifier of the taxon whose taxon image the image is
- Caption (en), Caption (fi), Caption (sv): image captions (kuvatekstit) in three languages.
- To finish, click "Save" to save the image and metadata. You can close the window by clicking the image or button Close.
- The form will remember the data you entered, so you don't have to do it again for the next image.
In principle you can upload several images at a time. However, in this way you have to save capturer information for each image separately, so it is more sensible to use the mass import for images.
Mass import
With mass import you can import hundreds of images to Kotka without having to wait on your computer for Kotka to save them.
Images can be saved even if the related specimens have not yet been saved to Kotka. The images will be shown when the specimen is saved, or at the latest the next night.
- With the mass import Kotka connects images to specimens based on the name of the image files. Name the image files so that they start with the short form of the specimen ID and are followed by an underline character _ , for example JA.123_anyname.jpg. If you include desired tag in the filename it will be added to the list of tags. For example file name HT.1234_Betula_pendula_label.jpg will add "label" tag. And HT.1234_specimen_label.jpg will add "specimen" and "label" tags.
- Go to the mass import page in https://kotka.luomus.fi/specimens/images (or from menu Specimens > Add multiple images)
- Import the images in either of the following ways:
- If there are a lot of images: transfer the images to a local network drive into folder P:\h978\public_all\webkuva\SUBFOLDER-YOU-CREATED. Then copy the subfolder address to the Directory path-field on the import form.
- If you upload images while remote working outside the museum,you need to have a University of Helsinki VPN connection on, to access P-drive. Enter the same path on Kotka as above.
- The mass import from webkuva-folder only works for Luomus employees for now.
- If there are only a few images: click "Choose files" and manually choose the files from your computer.
- If there are a lot of images: transfer the images to a local network drive into folder P:\h978\public_all\webkuva\SUBFOLDER-YOU-CREATED. Then copy the subfolder address to the Directory path-field on the import form.
- Record the image information to the import form. See above for explanations of the form fields.
- To finish, click "Send images".
Editing existing images
In Kotka, From top menu bar, under Specimens, you can find the the page Edit images. There you can edit metadata for existing images and search images by
- Document ID (= Specimen ID)
- Capturer
- Holder of intellectual copyright
- Taxon ID
Image metadata form here has all the same fields as shown above.
Deleting images
Only administrators and advanced users can delete images. If you work with images a lot and often have a need to delete them, contact kotka(at)luomus.fi to ask for advanced user permissions.